Leads Chk guide
~ getchk / docs / leads-chk
Leads Chk turns WordPress into an email marketing tool that sends through Emailit. Your contacts, lists and every consent stay in your own database; Emailit delivers the email and reports what happened to it. It collects addresses with forms, popups, slide-ins and bars, sends newsletters and automatic emails in each contact's language, prepares a campaign draft when you publish a post, and gathers reviews from your contacts. The other Digital Checkmark tools send their contacts to it.
How it works
Contacts with their origin
each contact keeps where it came from (the form, the page, the UTM campaign, the referrer, the country and the language) and a history of what it did.
Consent apart from capture
an address left in a tool is a lead, not a subscriber. Only a person who ticks a box and confirms by email gets newsletters. Every consent is logged with the exact text, the IP address and the page.
Forms and popups
inline forms, popups, slide-ins and bars with triggers, targeting and their own conversion numbers. A form can also be a call to action that takes the visitor to a page.
Campaigns
newsletters in one or more languages, with preview, test sends, scheduling, a report and an automatic pause when too many emails bounce.
Automations
emails that go out on their own when a contact subscribes, uses a tool or gets a tag.
Auto-drafts
when you publish a post, a rule prepares a campaign draft and emails you the link to review it. It never sends on its own.
Reviews
five stars in any email open a review page; you approve the reviews and show them on your site with a shortcode.
Integrations
the other Digital Checkmark tools send their contacts here, each one with its own rule about the newsletter.
WordPress email
optionally, every email WordPress sends goes through the Emailit API, with your usual mailer as a backup and a log of every email.
Requirements
- WordPress 6.0 or newer
- PHP 7.4 or newer
- An Emailit account with a sending domain verified in Emailit, and an API key. A key with full access is recommended: with a sending-only key, email works but the copy of the contacts in Emailit and the reading of delivery events are off.
- Recommended: a system cron that runs the sending worker every minute (see System cron).
- Optional: a Reoon Email Verifier key to check addresses, an OpenAI-compatible AI provider for writing help, and Cloudflare Turnstile keys if you prefer it to the built-in check.
Leads Chk starts collecting contacts as soon as it is active, even before Emailit is connected. Only sending needs Emailit.
First steps
The minimum to collect contacts and send your first newsletter, in order. Each step links to the section that explains its screen in full. Leads Chk > About shows the same path under "First steps".
Install and activate Required
Upload the Leads Chk zip in Plugins > Add Plugin > Upload Plugin, then activate it. Leads Chk creates its tables, a public list called "Newsletter" (the default list) and a welcome automation as a draft.
Connect Emailit (required to send)
In Leads Chk > Settings, paste an Emailit API key with full access and press "Save settings". The "Go-live check" at the top says what is still missing. See Emailit.
Fill in the sender and the postal address Required
In "Sender and branding": "From email" on a domain verified in Emailit, "From name", "Company" and "Postal address". The postal address goes in the footer of every newsletter, as anti-spam laws ask. See Settings.
Add the system cron Recommended
Emails leave from a background queue. With WordPress cron alone, the queue only moves when the site gets visits. A system cron that runs the worker every minute keeps the pace steady. See System cron.
Put a signup form on the site Recommended
In Leads Chk > Forms & popups, press "Create a newsletter popup" or "Create an inline form". Review the texts and set the form to "Active (shown on the site)". See Forms and popups.
Activate the welcome email Recommended
In Leads Chk > Automations, open "Welcome to the newsletter", read the email in each language and press "Activate". From then on, everyone who confirms the subscription gets it. See Automations.
Connect your other tools Optional
Each Digital Checkmark tool that is active shows up in Leads Chk > Integrations. What it does with the addresses it collects is set in that tool's own Integrations screen. See Integrations.
Send your first campaign Optional
In Leads Chk > Campaigns, press "New campaign": choose who receives it, write it in each language, preview it, send yourself a test and send or schedule it. See Campaigns.
Address checks, writing help and auto-drafts Optional
Reoon to reject addresses that do not exist (Reoon), an AI provider to suggest subjects and translate (AI writing help), and a rule that prepares a draft each time you publish a post (Auto-drafts).
What visitors see
The forms
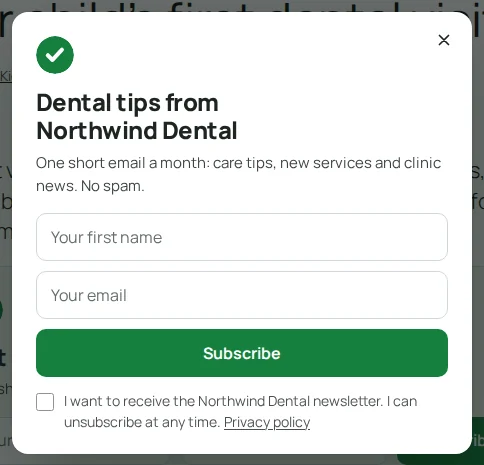
An inline form sits in the page content: where you put it with the shortcode, the block or the Elementor widget, or at the start or end of each post. Popups, slide-ins and bars appear by themselves, following their triggers. Each one shows your title, text, email field, button and, by default, a consent checkbox the visitor must tick. Under every form and popup, a small "A tool by Digital Checkmark" line links to digitalchk.com.
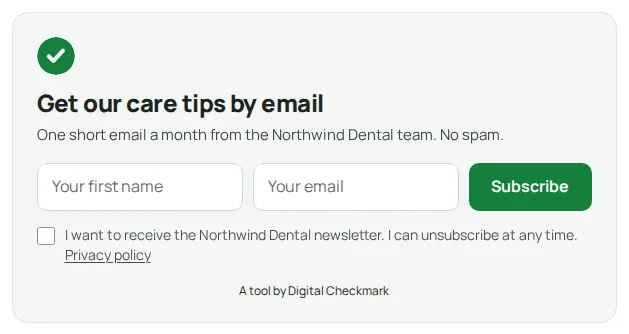
A call to action looks the same but has no fields: its button takes the visitor to a page, for example a free tool.
When something is wrong
The form answers in the visitor's language, under the button. The most common messages:
- "Please enter a valid email address."
- "Please tick the box to confirm that you want to subscribe."
- "Please use a permanent email address." The address is from a disposable email service.
- "This email address does not seem to exist. Please check it." The address checker rejected it (see Reoon).
- "That was quick! Please wait a few seconds and try again." The form was sent faster than a person can type.
- "Too many attempts. Please try again later."
- The messages of Leads Chk > Allowed emails, when you limit which addresses are accepted (see Allowed emails).
Confirming the subscription
With double opt-in on (the default), the visitor sees the success message (by default, it asks them to check their inbox) and gets the email "Confirm your subscription to" your company, with the button "Confirm my subscription". The link opens a page on your site with the same button: the subscription is confirmed with that second press, so the security scanners that open links in emails never confirm anyone by mistake. Then the page says "You are subscribed", or sends the person to your own page (see Settings).
Confirmation links work for 30 days. An old or used link says "This link has expired" or "Nothing to confirm", and never subscribes again someone who left.
Every newsletter
At the foot of each newsletter: your company, your postal address, "Email preferences" and "Unsubscribe". Mail programs that support it (Gmail, Outlook, Apple Mail) also show their own unsubscribe button, which works with one click.
- "Unsubscribe" opens a page that asks "Do you want to stop receiving our newsletters at" the address, with "Unsubscribe from all emails" and "Choose which emails instead".
- "Email preferences" opens a page with the public lists, the first name and the "Language of the emails", and "Save preferences". Preference links last six months; an expired one offers "Email me a new link". Unsubscribe links work for ever.
All these pages and emails use your logo, brand colour and fonts, and show in the contact's language.
In the other tools
A Digital Checkmark tool connected to Leads Chk can show a newsletter checkbox next to its own email field, with the wording set in its Integrations screen. It can also show a Leads Chk inline form right under the tool. See Integrations.
The review page
Five stars or a button in an email open a review page on your site: "How was your experience?", the stars, the text, the name to show, the company or role and the permission to publish. See Reviews.
Consent
Leads Chk keeps two things apart: having someone's address, and having their permission to send them newsletters.
| Status | What it means |
|---|---|
| "Lead (no consent)" | The address arrived from a tool, a contact form, an import or by hand, without a newsletter opt-in. It is stored, but never gets campaigns or automations unless you tick "Leads without consent" in them. |
| "Pending confirmation" | The person asked to subscribe and has the confirmation email. If they do not confirm, after "Unconfirmed signups expire after" (30 days by default) they go back to lead. The confirmation link works for that same time. |
| "Subscribed" | The person confirmed (or subscribed with double opt-in off). Gets the newsletters of their lists. |
| "Unsubscribed" | The person left. A later signup or an import never subscribes them again without a new confirmation. |
Besides the status, each address has its own state: a bounce marks it "Bounced", a spam complaint "Marked as spam", and the address checker "Invalid address". Those addresses stop getting newsletters on their own.
What is recorded
Every consent goes to the contact's history with the exact text the person read, the IP address, the page and the date: the signup, the confirmation, the unsubscribe, a change of preferences, an import as subscriber or a change by an admin. That record is your proof that the person agreed.
Leads without consent
Campaigns and automations have a "Leads without consent" box, off by default. Sending to leads is legal in the United States with an unsubscribe link (CAN-SPAM), but not for people in the European Union (GDPR), and it raises spam complaints. Use it only for one-off messages closely related to what the person did.
A ticked box in Europe
A box that arrives ticked is not valid consent in Europe. The newsletter checkbox that the connected tools show can start ticked everywhere except Europe, decided on each visit from the visitor's country. See Integrations.
Dashboard
Leads Chk > Dashboard sums up the list, the forms, the campaigns and the sending. "New campaign" at the top opens the campaign editor.
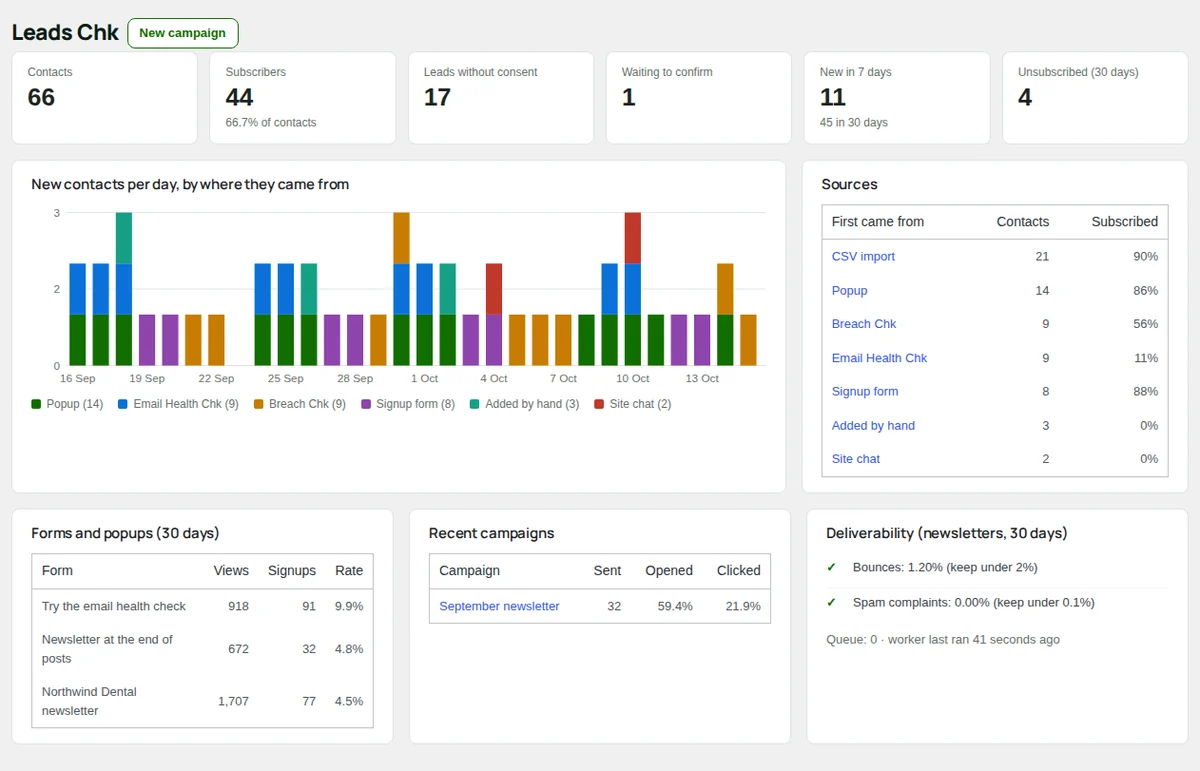
- While Emailit is not connected, a note says that leads are already being collected and links to Settings. Once it is, a warning appears if any item of the "Go-live check" needs attention.
- The figures: "Contacts", "Subscribers", "Leads without consent", "Waiting to confirm", "New in 7 days" and "Unsubscribed (30 days)". Each one opens the contacts list with that filter.
- "New contacts per day, by where they came from": the last 30 days, one colour per source.
- "Sources": where contacts first came from, how many and what share subscribed. A click opens those contacts.
- "Forms and popups (30 days)": views, signups and rate of each active form.
- "Recent campaigns": sent, opened and clicked of the last five.
- "Deliverability (newsletters, 30 days)": bounces (keep them under 2%) and spam complaints (under 0.1%), with the size of the queue and when the worker last ran.
Contacts
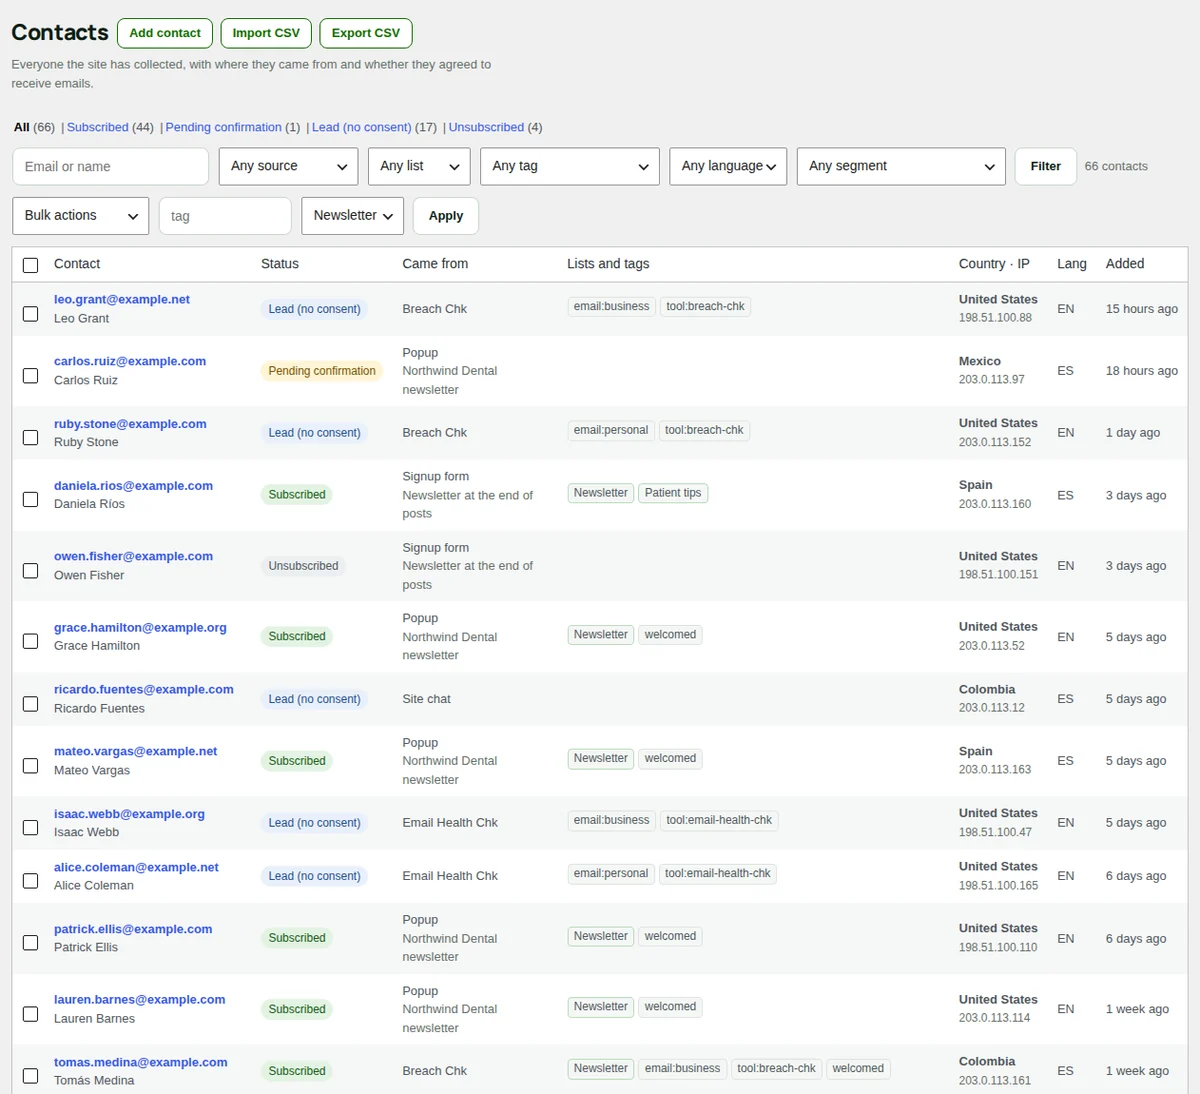
Leads Chk > Contacts lists everyone the site has collected, with where they came from and whether they agreed to receive emails. The newest first, 50 per page.
Find contacts
- The tabs at the top: "All", "Subscribed", "Pending confirmation", "Lead (no consent)" and "Unsubscribed", with how many in each.
- The filters: "Email or name", source, list, tag, language and segment. Press "Filter"; "Clear" removes them.
- The columns: "Contact", "Status", "Came from", "Lists and tags", "Country · IP" (the full country name, with its code on hover), "Lang" and "Added".
Change many at once
Tick contacts (or "Select all"), choose a "Bulk actions" option and press "Apply":
- "Add tag", "Remove tag" or "Remove from list".
- "Verify addresses": checks each address with the verifier of Settings and marks the bad ones "Invalid address". It needs Reoon or Emailit set up (see Reoon).
- "Unsubscribe".
- "Delete (erase)": removes the contacts and their history here and in Emailit.
A contact's profile
Press a contact to open it. It shows when and where it first came, and since when it is subscribed.
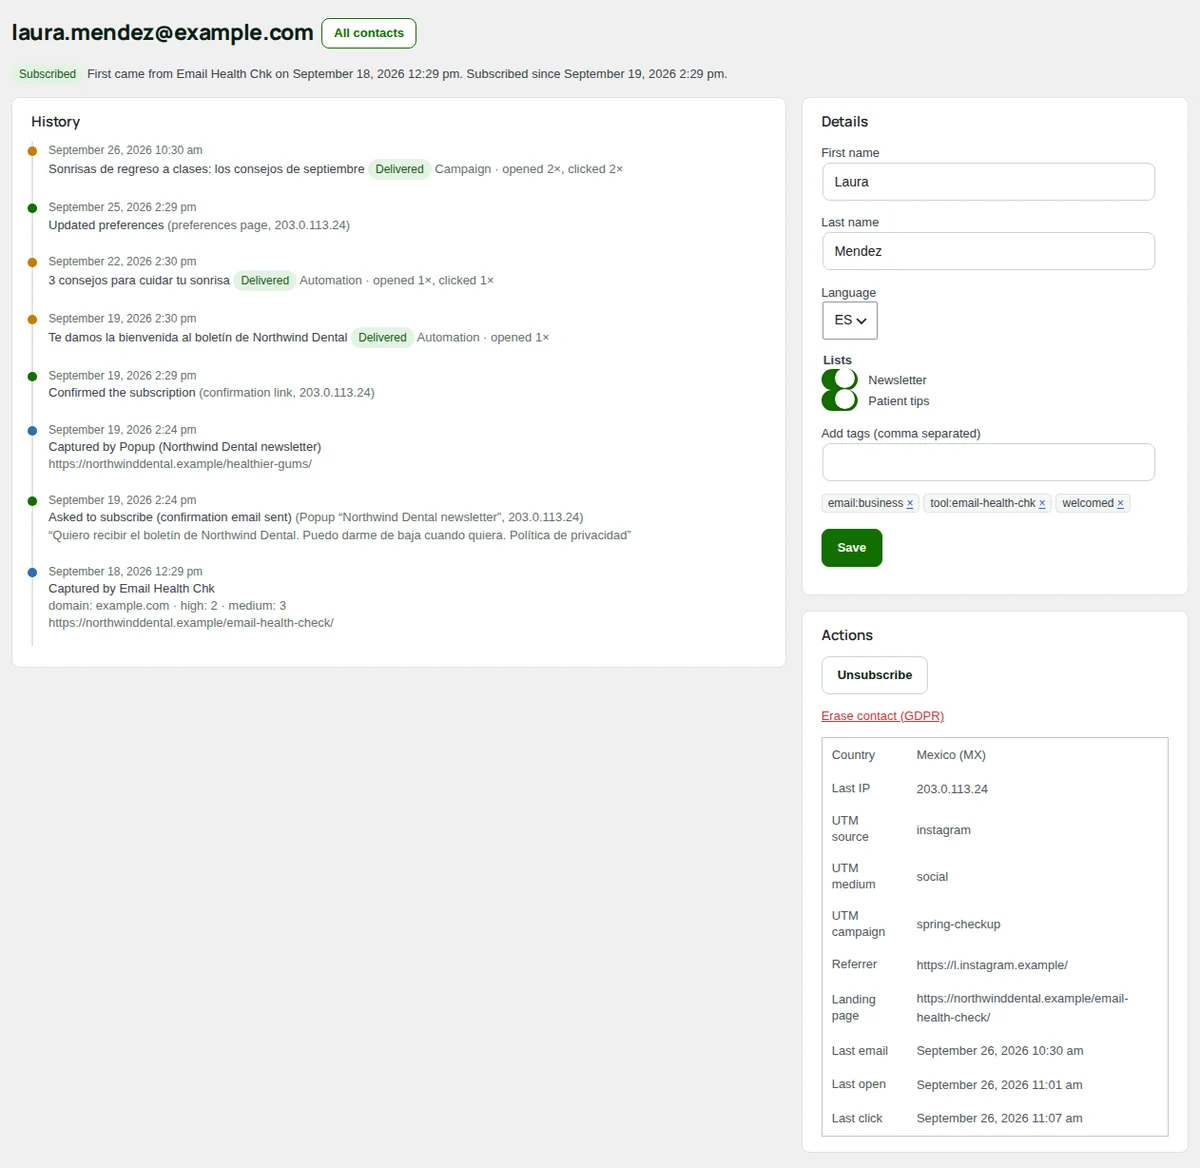
- "History": every touch (each tool or form it used, with its data), each consent change and each email with its opens and clicks.
- "Details": first name, last name, language, lists and tags. Ticking a list only subscribes someone who is already subscribed; for anyone else, also tick "This person gave me permission to email them (records consent)" and write how they agreed. That note goes to the consent record.
- "Actions": "Resend confirmation email" (for pending contacts; at most once every 10 minutes and 3 times a day), "Unsubscribe", "Mark address as valid again" (after a bounce you fixed) and "Erase contact (GDPR)", which deletes it here and in Emailit.
- Below: country, last IP, UTM source, medium and campaign, referrer, landing page, the last email, open and click, and the contact's ID in Emailit.
Add a contact by hand
"Add contact": email, names, language, lists and tags. Without "This person gave me permission to email them (records consent)", the contact is stored as a lead and is not added to lists.
Import a CSV
"Import CSV" takes a file with a header row, up to 10,000 rows and 10 MB. The email column is required; first_name, last_name, name, lang, country and tags (separated by | or ;) are read too, and any other column is stored as a custom field.
Choose the file and its origin
In "Where these contacts come from", write a name you will recognise later, for example the old system. It becomes the source of these contacts.
Choose the consent
"Store them as leads (no newsletter)" is the safe choice. Choose "They all agreed to receive our emails" only if it is true, and write how they agreed: it is kept as proof.
Lists and tags
"Add subscribers to" the lists you want and, optionally, "Tags for everyone". Press "Import".
The result says how many are new, updated and skipped. Invalid and disposable addresses are skipped. A contact who had unsubscribed is never subscribed again by an import.
Export
"Export CSV" downloads the contacts of the current filters.
Lists, segments and tags
Leads Chk > Lists & segments has three tabs: "Lists", "Segments" and "Tags".
Lists
Lists are what people subscribe to. Leads Chk starts with one list, "Newsletter", public and the default.
- "Public (subscribers can choose it)": the list appears on the preference page, so each subscriber can join or leave it.
- "Default list": used when a form or a tool does not name a list. The default list cannot be deleted.
- "Description (shown in the preference page)": one line that tells subscribers what the list is about.
- The table shows the subscribers of each list and, with the copy in Emailit on, the Emailit audience it is linked to.
Deleting a list keeps the contacts; only their membership is removed.
Segments
A segment is a saved filter, for example the people who signed up with the popup and speak Spanish, or those who opened something in the last 30 days. Use it to filter contacts or to choose who receives a campaign. The number of contacts updates as people change, so a segment is always current.
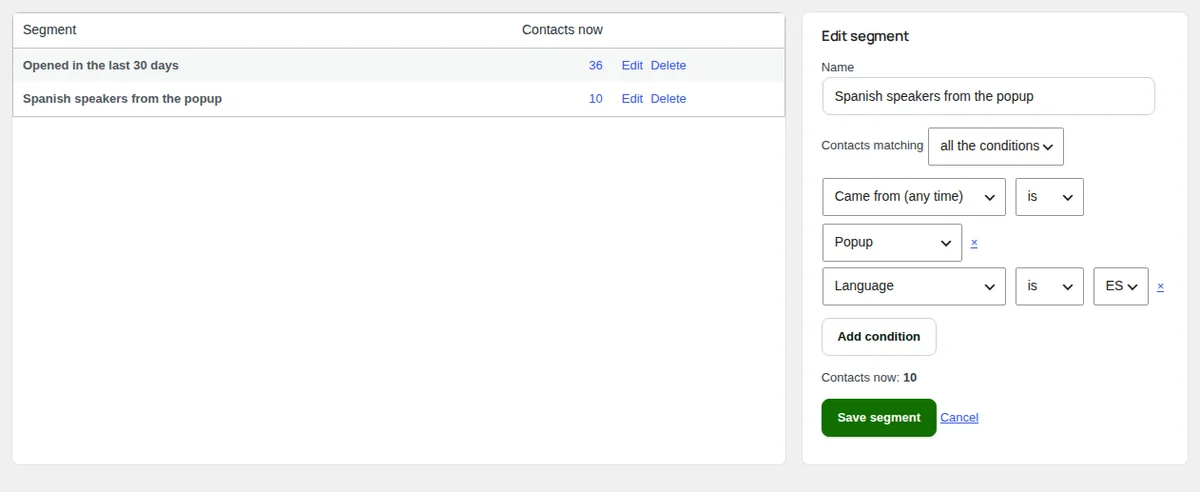
Name it
Write a name you will recognise in the campaign editor.
Add the conditions
Choose "all the conditions" or "any condition", then press "Add condition" for each one. You can filter by "Status", "Email status", "Came from (any time)", "First came from", "Tag", "List", "Language", "Country (ISO code)", "Email", "Added", "Last opened an email", "Last clicked an email", "Opened campaign", "Clicked in campaign" and "Custom field (key=value)".
Check the count and save
"Contacts now:" shows how many match while you edit. Press "Save segment".
Tags
Tags are labels on contacts. The connected tools add them on their own (for example the tool the address came from, how it arrived, business or personal email, and the result), reviews add reviewed and the kind of reviewer, and you add your own from a contact, in bulk or with an automation step. The tab shows how many contacts carry each tag. "Delete" removes a tag from every contact.
Campaigns
Leads Chk > Campaigns holds your newsletters. Each one goes out through Emailit, one email per recipient, in each contact's language. The "Auto-drafts" tab at the top holds the rules that prepare drafts on their own (see Auto-drafts).
The table shows the status, the recipients, the opens and clicks, the date and the actions: "Edit" for drafts and scheduled campaigns, "Report" for the rest, "Duplicate" and "Delete". For drafts, the recipients are the contacts that match the audience right now.
Write and send a campaign
Press "New campaign". You can write and preview without Emailit; sending needs the API key.
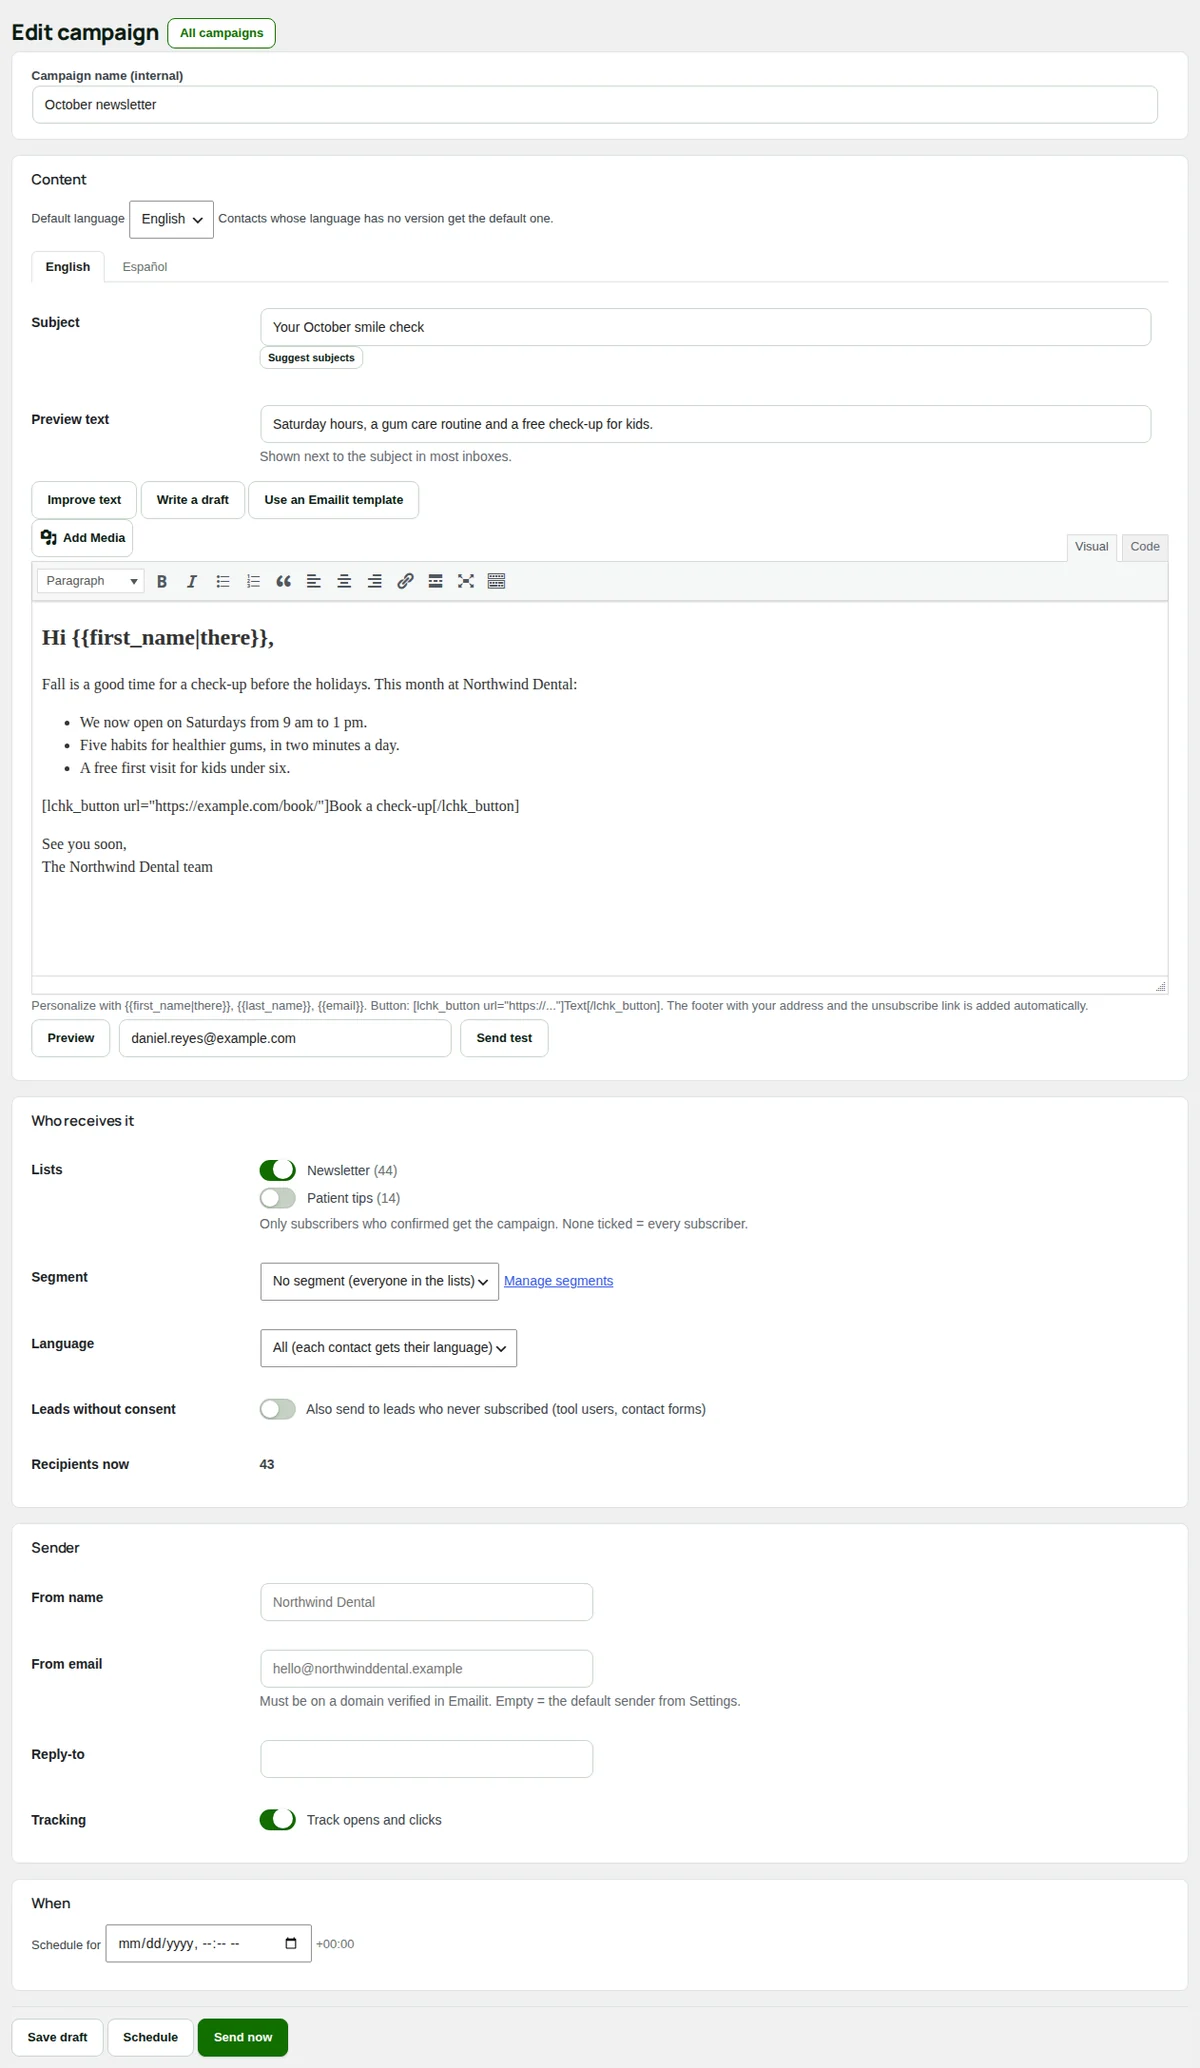
Name it Required
"Campaign name (internal)" is only for you, for example the month of the newsletter.
Write the content Required
The subject, the preview text and the body in each language, in the email editor (see Email editor). The default language version needs a subject and content.
Choose who receives it Required
In "Who receives it":
- "Lists": only subscribers who confirmed get the campaign. None ticked means every subscriber.
- "Segment": narrows the lists to a segment (see Lists, segments and tags). "Manage segments" opens them.
- "Language": all (each contact gets their language), or only the contacts of one language.
- "Leads without consent": off by default. On, it also sends to leads who never subscribed. Read Consent first.
"Recipients now" counts them as you change the options.
Check the sender Optional
"From name", "From email" and "Reply-to". Empty fields take the values from Settings. The address must be on a domain verified in Emailit. "Track opens and clicks" comes from Settings and can be changed here.
Test, then send or schedule Required
Press "Preview" and "Send test" in the editor. Then:
- "Send now" asks for confirmation with the number of recipients and starts at once. The emails go out in the background at the pace set in Settings, and the report opens.
- "Schedule" sends it at the date and time of "Schedule for", in the site's time zone. The date must be in the future.
- "Save draft" keeps it for later.
- On a scheduled campaign the buttons are "Save changes", which keeps it scheduled (with the date in "Schedule for"), and "Back to draft", which takes it out of the schedule.
A campaign that has started cannot be edited. "Duplicate" makes an editable copy.
Automatic pause
After 200 emails, a campaign pauses itself if more than 5% of the emails bounced or more than 0.3% of the recipients marked it as spam. Its report says why. Clean the list before you press "Resume".
Daily limit
Campaign and automation emails stop for the day when they reach the "Daily limit for newsletters" of Settings, and continue the next day (the day changes at midnight UTC). Confirmation emails and WordPress email are not counted and keep going out.
Email editor
Campaigns, automation emails and auto-draft templates share the same editor.
Languages
When the site has more than one language, there is a tab per language and a "Default language". Each contact gets the version in their language; contacts whose language has no version get the default one. The languages come from Settings, or from Polylang when it is active.
Subject and body
- "Subject" and "Preview text" (shown next to the subject in most inboxes).
- The body, in the WordPress editor, with images from the media library.
- The footer with your company, your address and the unsubscribe link is added on its own. Do not write it.
Personalize
Write these tags in the subject or the body:
| Tag | Becomes |
|---|---|
{{first_name|there}} | The first name, or the word after the bar when there is none. Leave it empty ({{first_name|}}) and the space before the comma goes too. |
{{last_name}}, {{name}}, {{email}} | The last name, the full name, the address. |
{{company_name}}, {{company_address}}, {{site_name}}, {{site_url}}, {{year}} | Your data from Settings and the site. |
{{preferences_url}}, {{unsubscribe_url}} | The contact's own links. |
{{review_stars}}, {{review_url}} | Five clickable stars, or the link, to the review page (see Reviews). |
{{attr.key}} | A custom field of the contact, for example one imported from a CSV. |
A button: [lchk_button url="https://..."]Text[/lchk_button]. The connected tools can add their own tags, for example {{breach_alert}} from Breach Chk and {{ransomware_alert}} from Ransomware Chk.
AI writing help
With an AI provider in Settings, the editor shows (see AI writing help):
- "Suggest subjects" next to the subject.
- "Write a draft": asks what the email should be about, in a few points, and writes it.
- "Improve text": asks how it should change; empty means clearer and shorter.
- "Translate from" the default language, in the other tabs.
Read what the AI writes before you send it.
Emailit templates
With Emailit connected, "Use an Emailit template" lists the published templates of your Emailit workspace and loads the one you choose. The email then goes out as is, with the unsubscribe footer added. "Switch back to the editor layout" returns to the editor.
Preview and test
"Preview" shows the email with the details of a sample contact. Write one or more addresses next to it and press "Send test": the test goes through Emailit, so it needs the API key, and appears in the Email log as a test.
Campaign report
Once a campaign starts, its row in Leads Chk > Campaigns opens the "Report". It updates as Emailit reports deliveries, opens and clicks.
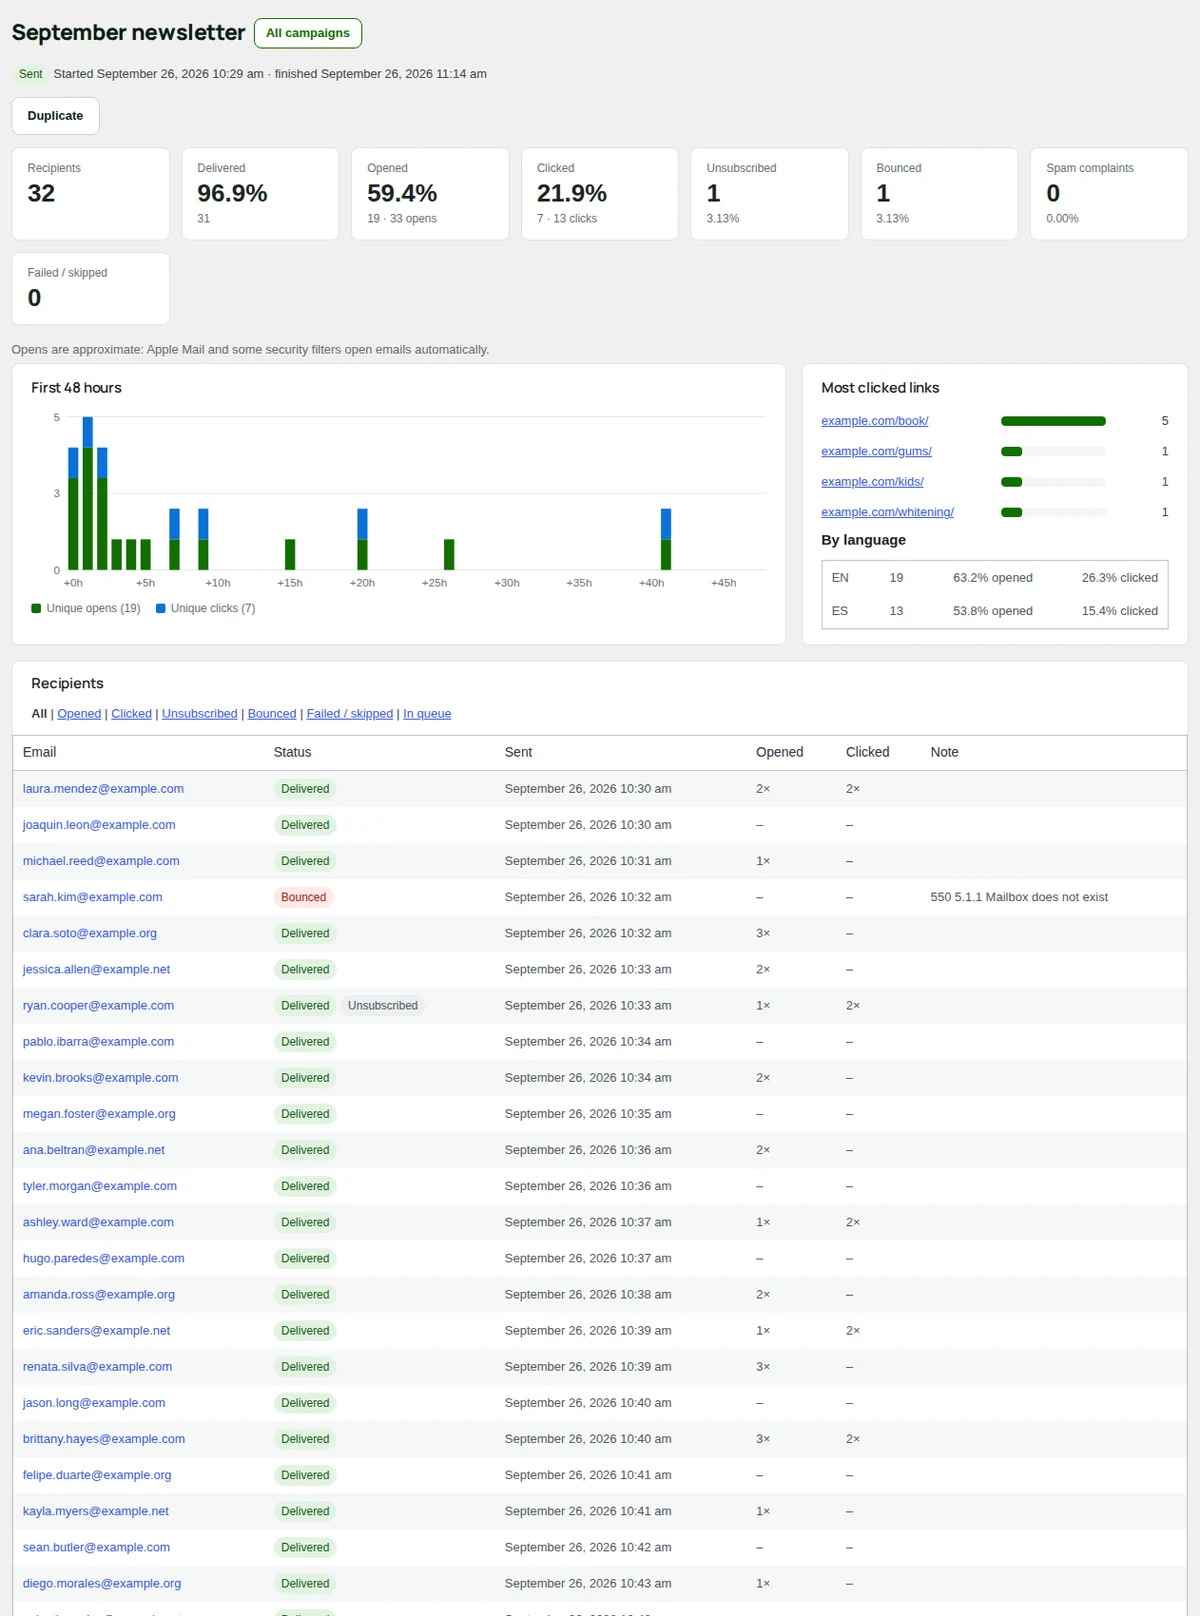
- At the top: the status, when it started and finished, and the buttons. "Pause" holds the emails not sent yet, "Resume" continues, "Cancel the rest" drops them for good, and "Duplicate" makes an editable copy.
- The figures: "Recipients" (and how many are still in the queue), "Delivered", "Opened", "Clicked", "Unsubscribed", "Bounced", "Spam complaints" and "Failed / skipped".
- "First 48 hours": unique opens and clicks per hour.
- "Most clicked links", each one whole and clickable.
- "By language": opens and clicks of each language version.
- "Recipients": every address with its status and when it opened and clicked, filtered by "Opened", "Clicked", "Unsubscribed", "Bounced", "Failed / skipped" or "In queue".
- "Email": the email as it was sent.
Opens are approximate: Apple Mail and some security filters open emails on their own. Clicks are a better signal. Opens and clicks are only counted with tracking on, and arrive through the Emailit webhook or, with a full-access key, every 5 minutes (see Emailit).
Auto-drafts
Leads Chk > Campaigns, tab "Auto-drafts". When a post is published, a rule prepares a campaign draft from it and emails you a link to review it. Nothing is sent automatically: you read the draft, test it and send it from Campaigns like any other.
The table shows each rule with its status, which posts it watches, how many drafts it created and the last one. "Pause" and "Activate" switch a rule; deleting a rule keeps the drafts it already created.
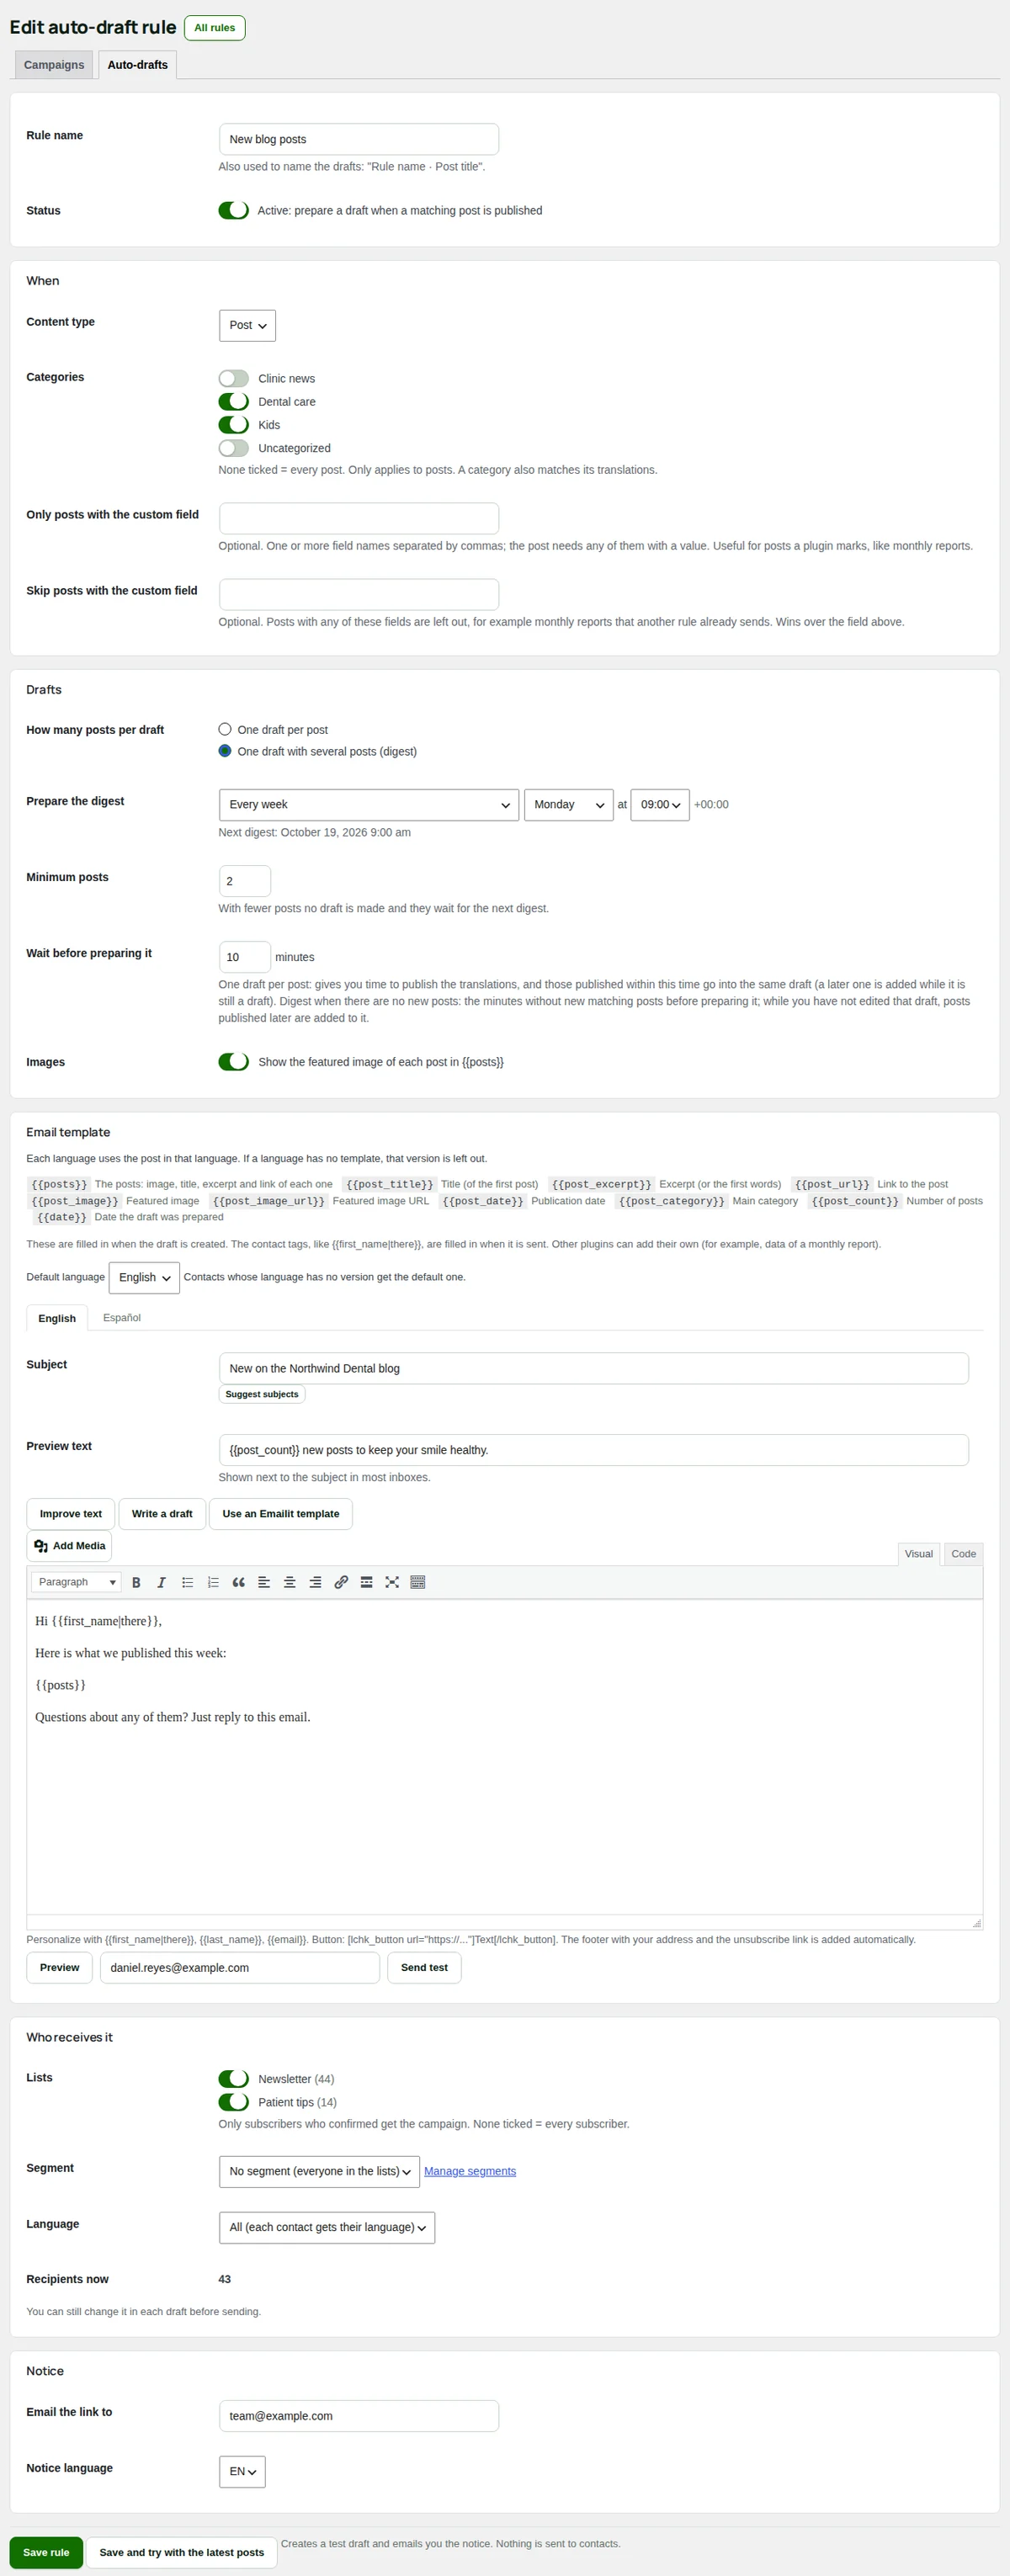
Name and status
Press "New rule". "Rule name" also names the drafts: rule name, a dot, and the post title. "Active: prepare a draft when a matching post is published" is on for new rules.
Which posts ("When")
- "Content type": posts, or another public content type.
- "Categories": none ticked means every post. A category also matches its translations.
- "Only posts with the custom field": optional. The post needs any of those fields with a value. Useful for posts a plugin marks, like monthly reports.
- "Skip posts with the custom field": optional. Posts with any of these fields are left out. It wins over the field above.
A post that was already published and is updated does not start a rule.
One draft per post, or a digest ("Drafts")
- "One draft per post": the draft is prepared "Wait before preparing it" minutes after publishing (10 by default). Translations published within that time go into the same draft; a later one is added while it is still a draft.
- "One draft with several posts (digest)": choose when in "Prepare the digest": "Every week" (day and hour), "Every month" (day 1 to 28 and hour) or "When no new matching post was published for a while" (the minutes of "Wait before preparing it"). With "Minimum posts", fewer posts make no draft and wait for the next digest. While you have not edited a digest draft, posts published later are added to it.
- "Images": shows the featured image of each post in
{{posts}}.
The email template
One template per language, in the email editor (see Email editor). Each language uses the post in that language; a language without a template is left out. These tags are filled in when the draft is created:
{{posts}}: a card per post, with image, title, excerpt and link.{{post_title}},{{post_excerpt}},{{post_url}},{{post_image}},{{post_image_url}},{{post_date}}and{{post_category}}: of the first post.{{post_count}}and{{date}}: how many posts and the date the draft was prepared.
The contact tags, like {{first_name|there}}, are filled in when the email is sent. Other plugins can add their own tags for their posts.
Who receives it and the notice
"Who receives it" works as in a campaign, and you can still change it in each draft. In "Notice", "Email the link to" is where the "Review and send" email goes (empty means the site admin email), and "Notice language" its language.
Save and try it
"Save rule" saves it. "Save and try with the latest posts" also creates a test draft from the latest matching posts and emails you the notice; nothing is sent to contacts. Delete the test draft when you are done.
Drafts are never overwritten after you edit them.
Automations
Leads Chk > Automations: emails that go out on their own when something happens: a contact subscribes to a list, uses one of the tools or gets a tag. Leads Chk comes with "Welcome to the newsletter", a welcome email in English and Spanish for new subscribers, as a draft.
The table shows the trigger, the status, the contacts "In progress" and "Finished", the emails sent and the opens. "Needs attention" marks an automation that cannot run as it is; open it to see why.
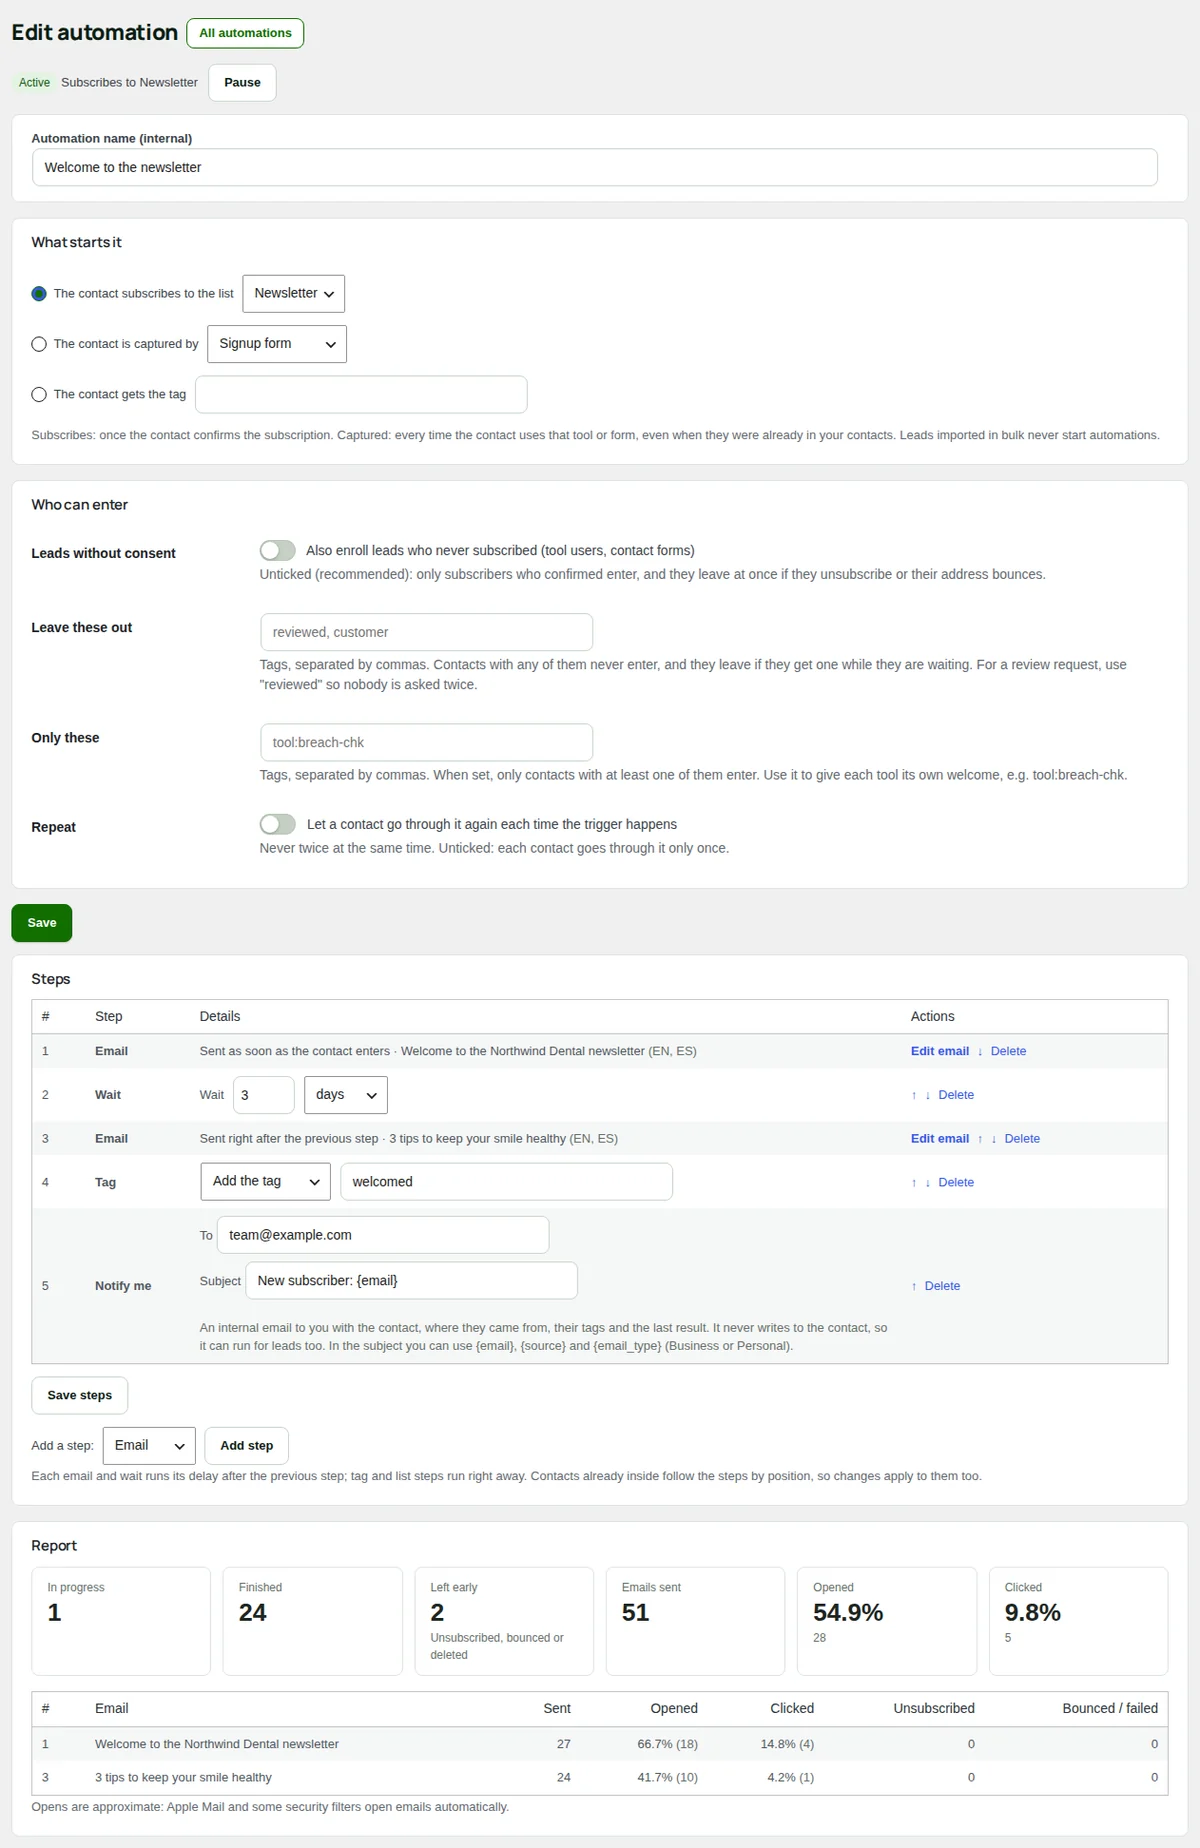
Choose what starts it Required
Press "New automation", give it a name and choose in "What starts it":
- "The contact subscribes to the list": once the contact confirms the subscription.
- "The contact is captured by": every time the contact uses that tool or form, even when they were already in your contacts.
- "The contact gets the tag": when the tag is added, by hand, by a tool, by a review or by another automation.
Leads imported in bulk never start automations.
Choose who can enter
- "Leads without consent": unticked (recommended), only subscribers who confirmed enter, and they leave at once if they unsubscribe or their address bounces. Ticked, leads also get these emails: read Consent.
- "Leave these out": tags, separated by commas. Contacts with any of them never enter, and leave if they get one while waiting. For a review request, use
reviewedso nobody is asked twice. - "Only these": tags, separated by commas. Only contacts with at least one of them enter. Use it to give each tool its own welcome, for example
tool:breach-chk. - "Repeat": lets a contact go through it again each time the trigger happens, never twice at the same time. Unticked, each contact goes through it only once.
Press "Create and write the first email".
Add the steps Required
Choose a step in "Add a step:" and press "Add step". An automation holds up to 50 steps.
- "Email": opens its own page with the email editor and "Send it", the wait after the contact enters (first step) or after the previous step. 0 means right away.
- "Wait": a pause in minutes, hours or days.
- "Tag": "Add the tag" or "Remove the tag".
- "List": "Add to the list" or "Remove from the list". Only contacts who are already subscribed are added; leads stay leads.
- "Notify me": an internal email to you with the contact, where they came from, their tags and the last result, and a button to open it. It never writes to the contact, so it can run for leads too. In the subject you can use
{email},{source}and{email_type}(Business or Personal).
"Move up", "Move down" and "Delete" change the order; press "Save steps" after changing a wait, a tag or a list. Contacts already inside follow the steps by position, so changes apply to them too. Contacts who reach an email that is not written yet wait there until it is.
Activate it
Press "Activate". If something is missing, the screen says what: a trigger, an email without a subject or content in the default language, a step without its tag or list, or the Emailit API key. From then on, contacts who match the trigger go through it. "Pause" stops new contacts from entering, and those already inside wait until you activate it again.
The report
Under the steps: "In progress", "Finished", "Left early" (unsubscribed, bounced or deleted), "Emails sent", "Opened" and "Clicked", and the results of each email step.
Forms and popups
Leads Chk > Forms & popups holds the newsletter signup forms for your pages, and the popups, slide-ins and bars that appear on the site by themselves. With double opt-in on, everyone who signs up gets the confirmation email.
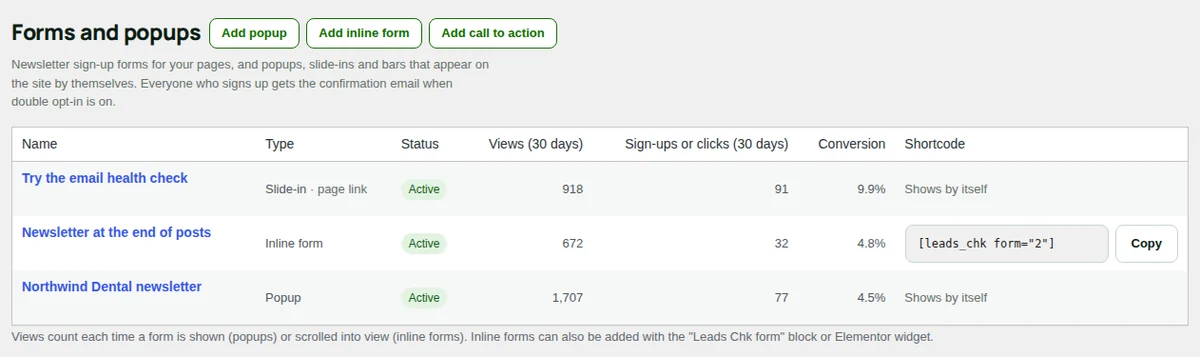
The table shows the name, the type, the status, "Views (30 days)", "Sign-ups or clicks (30 days)", "Conversion" and the shortcode, with "Edit", "Duplicate", "Activate" or "Deactivate" and "Delete". Views count each time a popup is shown or an inline form is scrolled into view. The numbers leave out automated browsers, logged-in site managers and the IP addresses of "Not counted in form statistics" in Settings.
Start with a ready-made form
With no forms yet, the screen offers three starters in English and Spanish:
- "Create a newsletter popup": appears after 20 seconds or when the visitor is about to leave, and stays hidden for a week once closed. It is created as a draft so you can review it first.
- "Create an inline form": created active; copy its shortcode into a page.
- "Create a call to action": see Calls to action.
Later, "Add popup", "Add inline form" and "Add call to action" at the top do the same.
Edit a form
The editor has the settings on the left and a live "Preview" on the right, with "Form" and "Success message". The preview uses the same markup as the site; sending is disabled there.
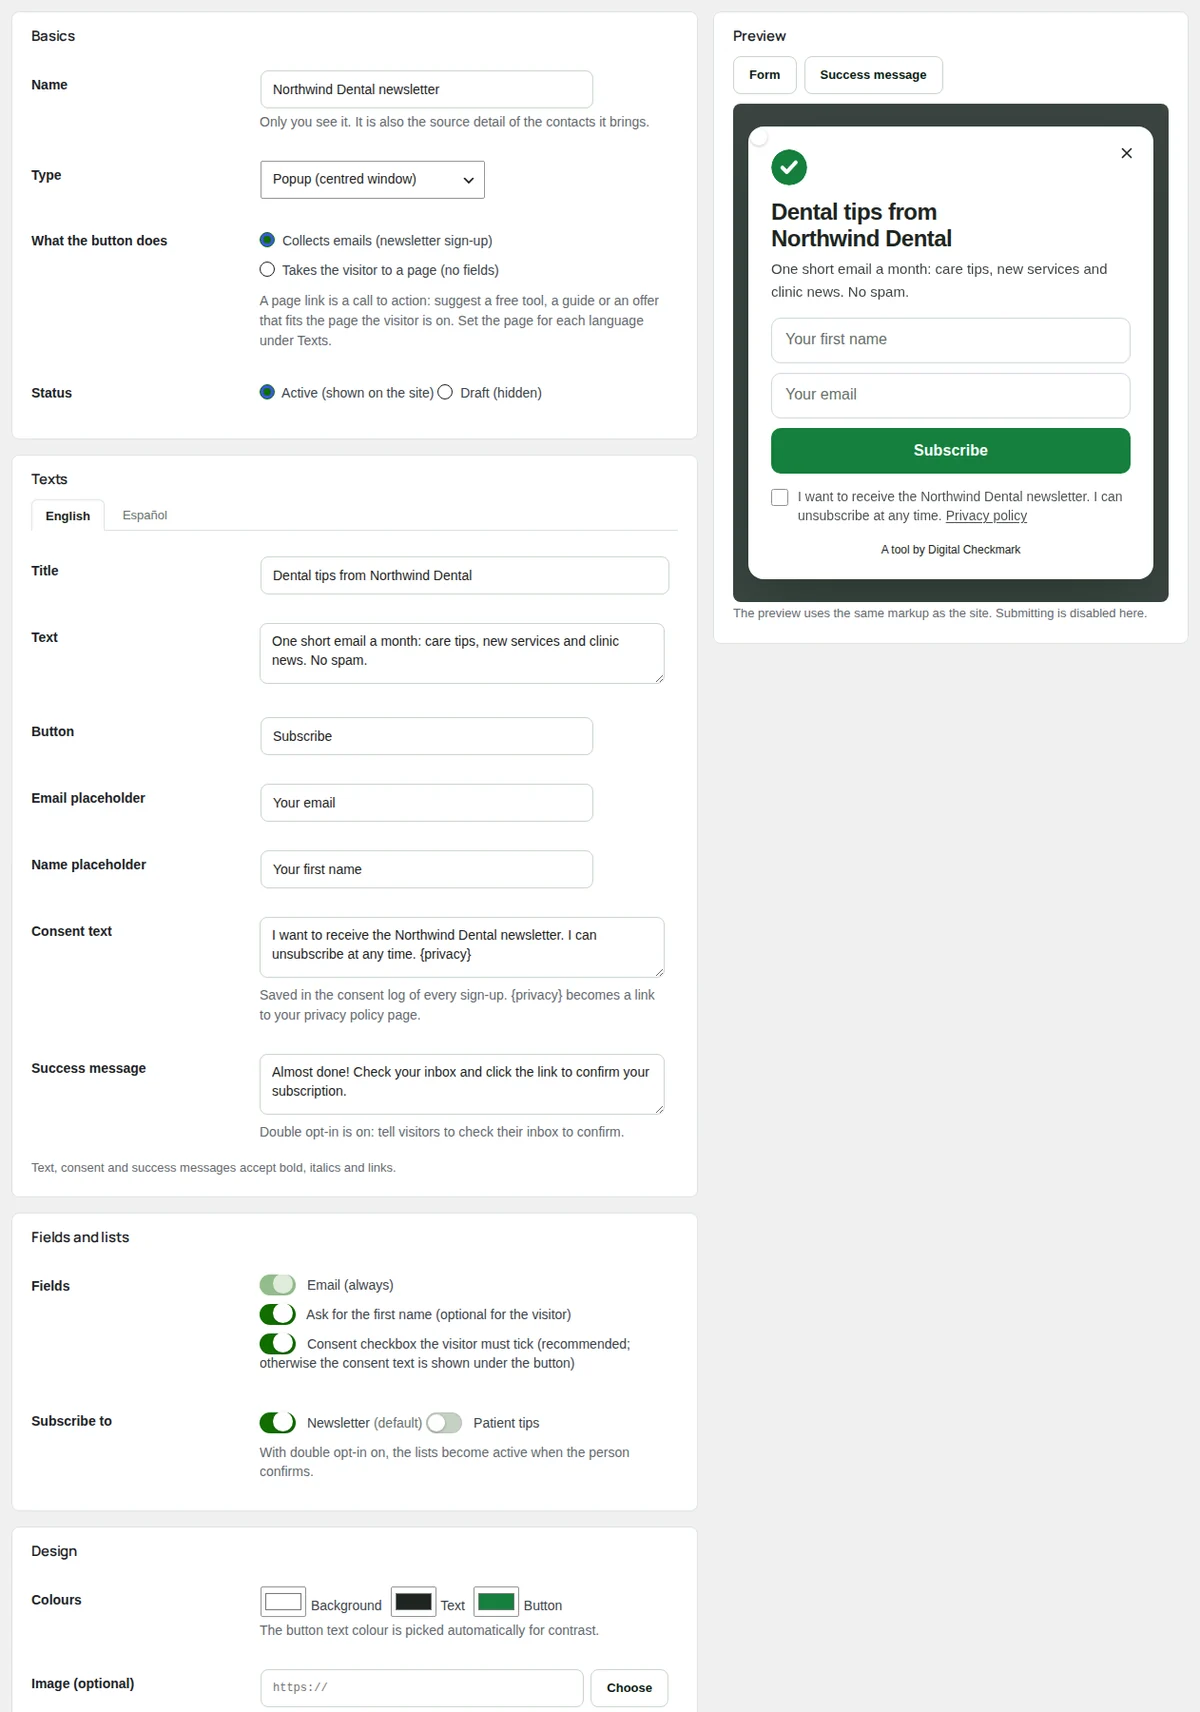
Basics
- "Name": only you see it. It is also the source detail of the contacts it brings.
- "Type": "Inline form (in the page content)", "Popup (centred window)", "Slide-in (corner box)" or "Bar (top or bottom of the page)".
- "What the button does": "Collects emails (newsletter sign-up)" or "Takes the visitor to a page (no fields)".
- "Status": "Active (shown on the site)" or "Draft (hidden)".
- "Placement", for inline forms: "Only where I add it (shortcode, block or Elementor widget)", "Automatically at the end of each post" or "Automatically at the start of each post". Automatic placement follows the rules of "Where and to whom".
- "Shortcode":
[leads_chk form="ID"], with "Copy". You can also use the "Leads Chk form" block or Elementor widget.
Texts
One tab per language: "Title", "Text", "Button", "Email placeholder", "Name placeholder", "Consent text" and "Success message". Text, consent and success messages accept bold, italics and links. In the consent text, {privacy} becomes a link to your privacy policy page. The consent text is saved in the consent record of every signup.
Fields and lists
- "Email (always)".
- "Ask for the first name (optional for the visitor)".
- "Consent checkbox the visitor must tick (recommended; otherwise the consent text is shown under the button)". On by default.
- "Subscribe to": the lists. With double opt-in on, they become active when the person confirms.
Design
"Background", "Text" and "Button" colours (the button text colour is picked for contrast), "Image (optional)" from the media library, and the "Layout": "Stacked (image on top, fields one under another)", "Image on the side (wide screens)" or "Compact (email and button on one line)". Slide-ins choose a "Corner" and bars a "Position". The fonts come from Settings or your theme.
When to show it (popups, slide-ins and bars)
It appears on whichever trigger comes first:
- "After" a number of seconds on the page (popups 20 by default, bars 5; 0 = off).
- "Or after scrolling" a share of the page (slide-ins 40% by default).
- "Exit intent": when the mouse leaves the window towards the tabs, on computers only. On for popups.
- "On click": the CSS selector of links or buttons that open it. A click always opens it, even if the visitor closed it before.
- "When an element appears": the CSS selector of something that shows up later, such as the result of a tool.
- "When an event fires": the name of a JavaScript event that another script fires on the page.
- "Then wait": seconds after the element or event (3 by default), so the visitor can first read what just appeared.
With no trigger at all, it appears as soon as the page loads.
Where and to whom
For inline forms these rules only apply to the automatic placement; a form you add by hand always shows where you put it.
- "Pages": "All pages", "Only these pages" or "All pages except these". In "Page addresses", one address per line from the first slash;
*matches anything, so/blog/*is the blog and every post in it. - "Content types": leave all unticked to show it everywhere, the home page and archives included.
- "Language", "Device" ("Desktop and mobile", "Desktop only" or "Mobile only") and "Visitors" ("Everyone", "First visit only" or "Returning visitors only").
- "Subscribers": "Hide from visitors who already signed up with any form on this browser". On by default.
Frequency
- "After the visitor closes it, hide it for" a number of days (7 by default). After signing up, the visitor never sees it again. 0 days shows it again on the next page.
- "Priority": each visit opens at most the number of popups of "Popups per visit" in Settings (1 by default). When more could open on a page, the higher priority wins; on a tie, the newest.
Press "Save form" (or "Create form"). A draft does not show on the site until you set it to "Active (shown on the site)".
Popups that wait for quiet
Popups that open on their own stay closed while the page carries the data-lchk-quiet attribute on its <html> element, for example while a chat window is open. Chatbot Chk does it for you. Popups opened with a click still work.
Calls to action
A call to action is a form with no fields: its button takes the visitor to a page instead of asking for an email. Use it to suggest a free tool, a guide or an offer that fits the page the visitor is on. A click on the button counts as its conversion.
Create it
In Leads Chk > Forms & popups, press "Add call to action". It starts as a slide-in with example texts, shown to subscribers too, and with priority 20 (a little above the default 10), so it wins over a newsletter popup on the same page. You can change the type to a popup, a bar or an inline form.
Set the page for each language
In "Texts", fill in "Button goes to" in each language tab: a page of your site (for example /tools/) or a full address. Leave it empty and the call to action does not show in that language. "Open the page in a new tab" is in "Basics".
Choose when it appears
The triggers of "When to show it" work as in any popup. Two fit calls to action well:
- "When an element appears": for example the result box of a tool, so the suggestion comes after the visitor gets their answer.
- "When an event fires": an event that another script fires on the page.
With "Then wait", it opens a few seconds later, so the visitor can first read what just appeared.
Activate it
Set "Status" to "Active (shown on the site)" and press "Save form". The list shows its clicks and click rate. After a click, the visitor does not see it again, and the click gives its place back in "Popups per visit", so the next suggestion can still show in the same visit.
Reviews
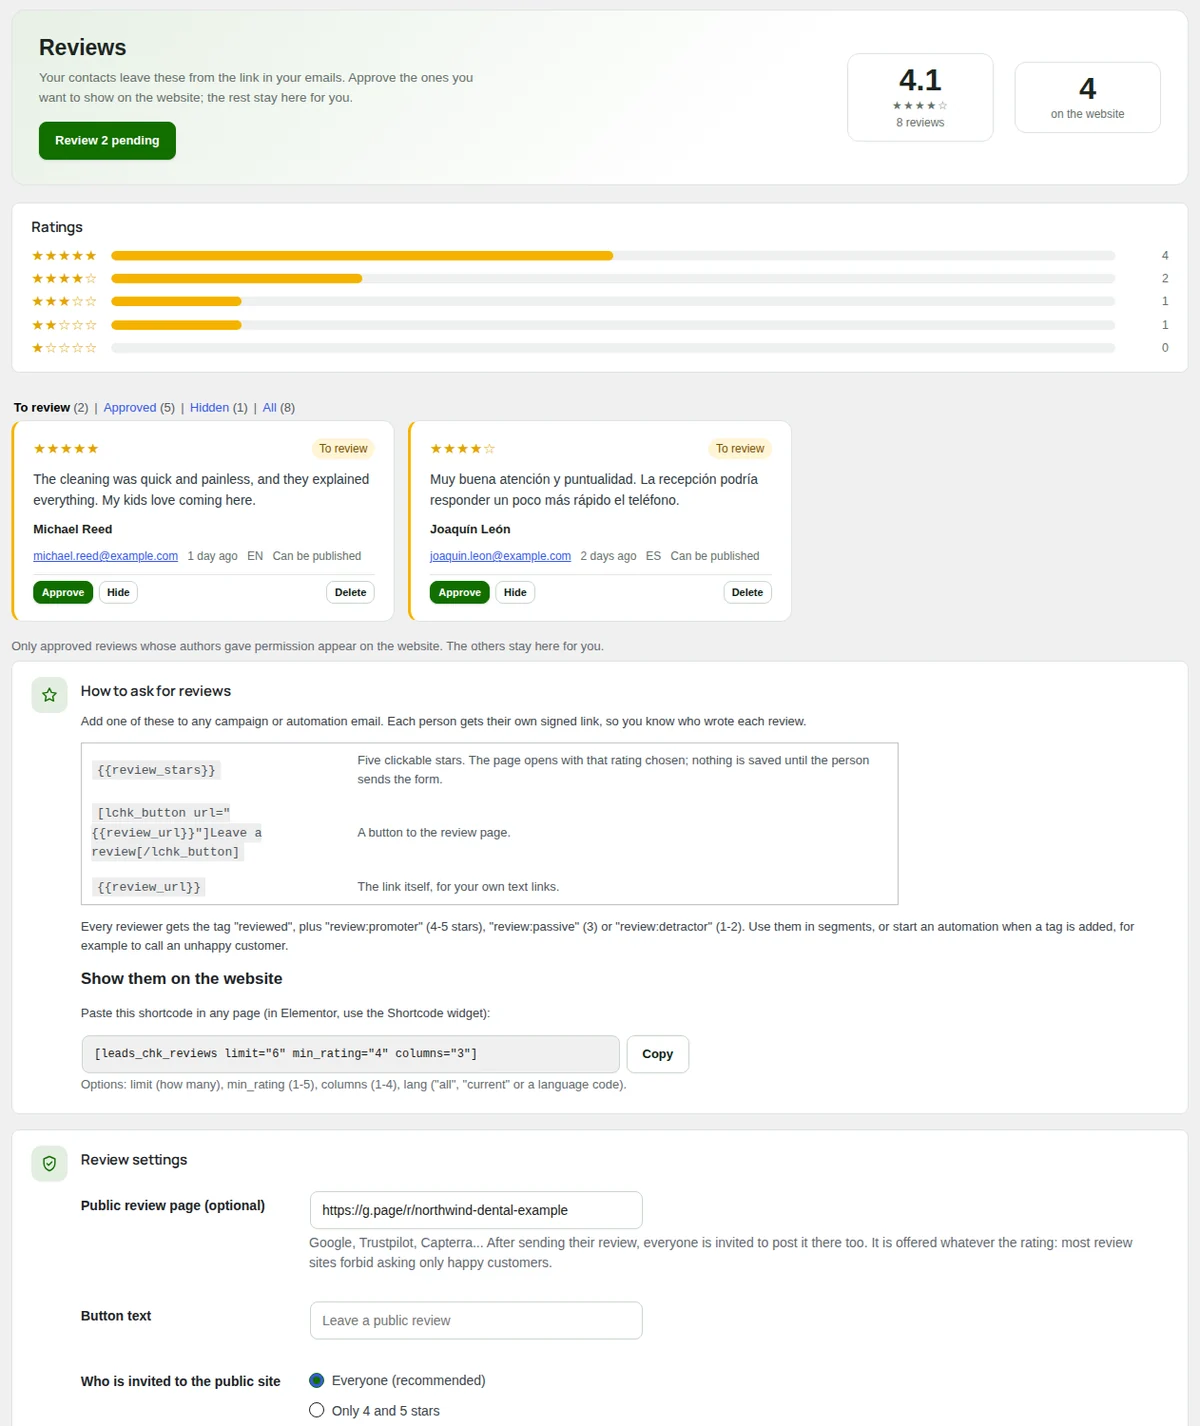
Leads Chk > Reviews: your contacts leave reviews from the link in your emails. Approve the ones you want to show on the website; the rest stay here for you.
Ask for reviews
Put the stars in an email
Add one of these to any campaign or automation email. Each person gets their own signed link, so you know who wrote each review.
{{review_stars}}: five clickable stars. The page opens with that rating chosen; nothing is saved until the person sends the form.[lchk_button url="{{review_url}}"]Leave a review[/lchk_button]: a button to the review page.{{review_url}}: the link itself, for your own text links.
A good place is an automation started by a tag, with reviewed in "Leave these out" so nobody is asked twice.
What the person sees
The review page asks "How was your experience?": the stars, "Your review", "Name to show", "Company or role (optional)" and the permission to publish. A person who already left a review can change it. After sending:
- With 1 to 3 stars: an apology and the "Tell us what happened" button, to an email or your contact page.
- With any rating, if you set a public review site: an invitation to post the review there too.
Approve or hide
The tabs "To review", "Approved", "Hidden" and "All". Each card shows the stars, the text, the author and whether it "Can be published" or is "Private: no permission to publish". Press "Approve" or "Hide". Only approved reviews whose authors gave permission appear on the website.
Every reviewer gets the tag reviewed, plus review:promoter (4 or 5 stars), review:passive (3) or review:detractor (1 or 2). Use them in segments, or start an automation when a tag is added, for example to call an unhappy customer.
Show them on the website
Paste the shortcode in any page (in Elementor, use the Shortcode widget):
[leads_chk_reviews limit="6" min_rating="4" columns="3"]
Options: limit (how many, 6 by default), min_rating (1 to 5, 4 by default), columns (1 to 4) and lang (all, current or a language code).
Review settings
- "Public review page (optional)": your page on Google, Trustpilot, Capterra or similar. "Button text" changes the text of its button.
- "Who is invited to the public site": "Everyone (recommended)" or "Only 4 and 5 stars". Google and Trustpilot do not allow asking only happy customers (review gating): if they notice, they can remove reviews or penalise the listing.
- Where "Tell us what happened" goes: an email address or a page. Empty means an email to your reply-to address.
- "Notifications": an email to the site admin when a new review arrives. On by default.
Press "Save review settings".
Integrations
Leads Chk > Integrations lists the plugins that send their contacts here: Breach Chk, Ransomware Chk, Email Health Chk, EML Analyzer, Toolkit Chk, Voice Chk and Chatbot Chk (as Site chat). A plugin appears as soon as it is active; nothing else is needed on this side.
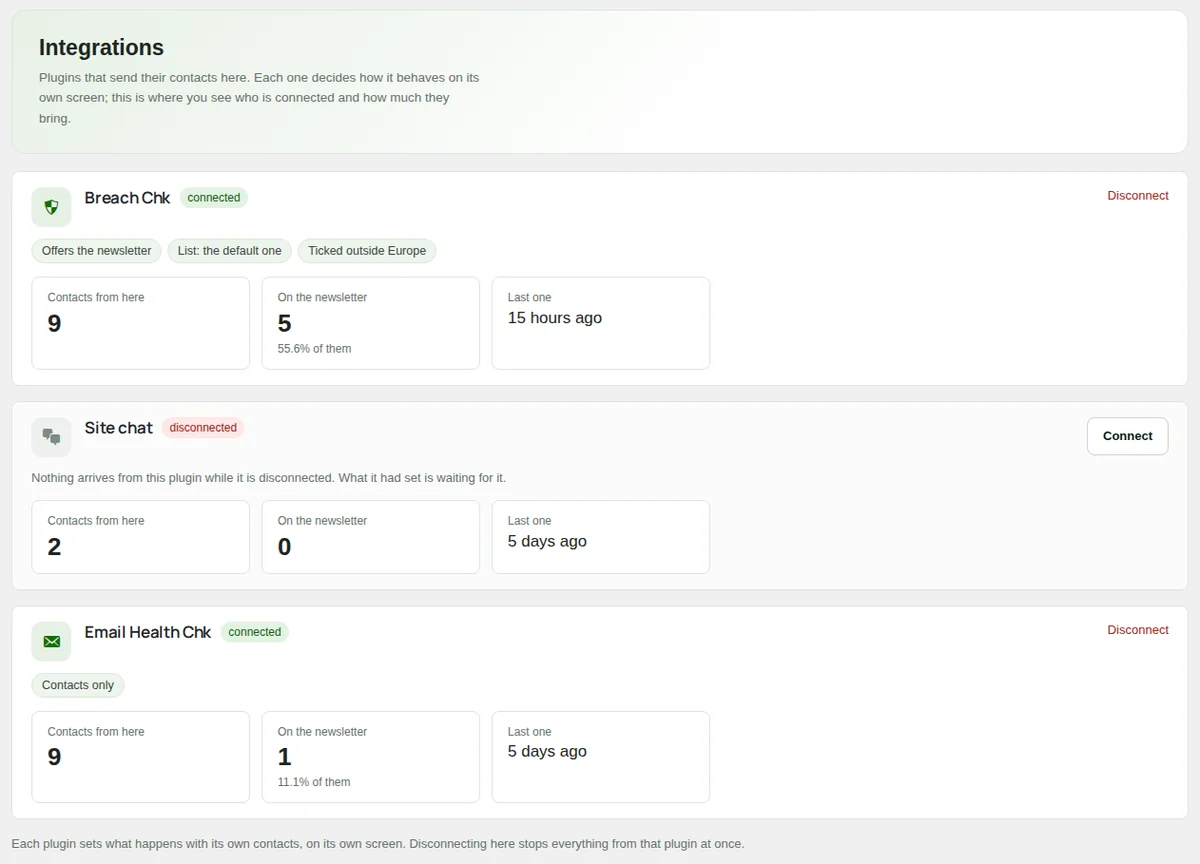
Each card shows the tool with its menu icon, whether it is "connected" or "disconnected", what it does in short ("Contacts only", "Offers the newsletter" or "Subscribes everyone", the list, and whether the box comes ticked), and its numbers: "Contacts from here", "On the newsletter" and "Last one". "Settings" opens the tool's own Integrations screen.
Disconnect a tool
"Disconnect" stops everything from that tool at once: no contact arrives and its newsletter checkbox is not shown either, so nobody is asked for something that would be thrown away. The contacts it already sent stay, and its settings wait for when you press "Connect" again.
Set what a tool does with the addresses
How each tool behaves is set inside the tool, in its own Integrations screen, in a Leads Chk block. The block is the same in every tool.
Open the tool's Integrations screen
From the card's "Settings" link, or from the tool's own menu.
Keep it connected
"Send the contacts of this plugin to Leads Chk" is on by default.
Choose what happens with the address
In "What happens with the address":
- "Save it as a contact, never subscribed to the newsletter" (the default, and the safe choice): you can still write to them from here, and ask for the newsletter later.
- "Save it, and offer the newsletter with a checkbox": the tool shows a newsletter checkbox next to its email field.
- "Save it and subscribe it to the newsletter": implied consent, which brings spam complaints. Not valid in Europe.
Choose the list and the checkbox
- "Which list": "The default list", another list, or "…or create a new one" with "Name of the new list". Only used when the contact is subscribed.
- "The checkbox starts ticked": a ticked box is not valid consent under the GDPR, and the rule follows the visitor, so the middle options decide on each visit from the visitor's country. The block says how your own visit is read, and warns when the server does not say where visitors are.
- "Never: the person ticks it themselves" (the default).
- "Everywhere except Europe (not in the EU, the UK, the EEA or Switzerland)".
- "Everywhere except Europe, and also when the country is unknown".
- "Always".
- "Checkbox wording": stored word for word with the subscription, as proof. Leave it empty for the built-in wording, already translated. A wording of your own is translated in Languages > Translations, group "Leads Chk", and has to be translated again each time you change it.
Retention and the form under the tool
- "Delete leads without consent after" a number of days since they last used the tool. Use the same period your privacy policy promises. Contacts who never subscribed are deleted completely, here and in Emailit, once every source they came from has passed its period. For subscribers only the tool result is cleared. 0 (the default) keeps them forever.
- "Newsletter form under the tool": an inline form from Forms & popups, shown right under the tool once per page. Whoever signs up with it gets the tag of the tool (for example
tool:breach-chk), so you can see which tool brings subscribers. Choose "None" when the page already has its own form.
Save the tool's screen. The card in Leads Chk > Integrations shows the new behaviour.
What the tools send
Every address arrives with tags: the tool, how the address arrived, business or personal email, and the result of the tool. The contact's history shows each use with its data. Leads Chk never reads other plugins: they send their contacts to it, and the rule of each tool is applied inside Leads Chk, so a tool cannot subscribe somebody you did not agree to subscribe.
Other sites and your own code can send contacts too (see For developers).
Email log
Leads Chk > Email log lists every email sent through Emailit from this site: newsletters, automation emails, confirmations, tests and, with WordPress email through Emailit on, every email WordPress sends.
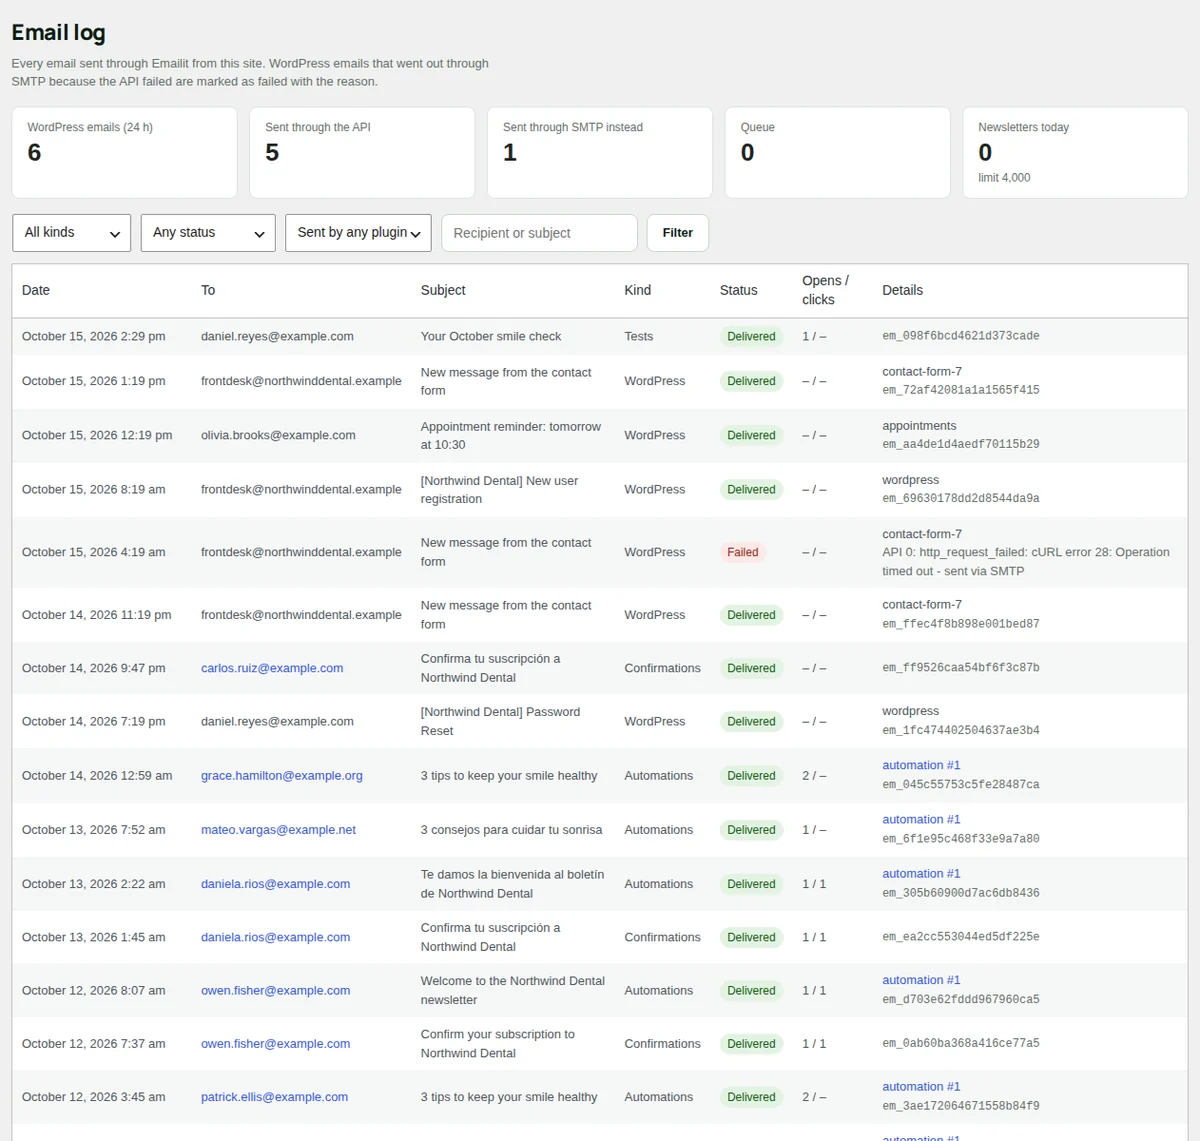
- The figures: "WordPress emails (24 h)", "Sent through the API", "Sent through SMTP instead" (when the API failed and your usual mailer sent it), "Queue" and "Newsletters today" with the daily limit.
- The filters: the kind ("WordPress", "Confirmations", "Campaigns", "Automations" or "Tests"), the status, "Sent by any plugin" (the plugin that sent a WordPress email) and "Recipient or subject".
- Each row: the date, the recipient (a link to the contact), the subject, the kind, the status, opens and clicks, and the details: the plugin, the campaign or automation, the error, and the email's ID in Emailit.
The statuses: "Queued", "Accepted" (Emailit took it), "Delivered", "Bounced", "Marked as spam", "Failed", "Rejected", "Suppressed" (on the Emailit suppression list), "Skipped", "Canceled" and "On hold" (an automation in pause).
WordPress and test emails are kept for "Keep the email log" days (180 by default); campaign numbers are kept. See Settings.
Settings
Leads Chk > Settings holds the connection to Emailit and every option of the plugin, in blocks. Press "Save settings" at the bottom to save the main form. If the settings changed in another tab while this page was open, the newer values of the fields you did not touch are kept, and the screen says which.
Go-live check
The first block says what is ready and what is missing, with a tick, a warning or a cross:
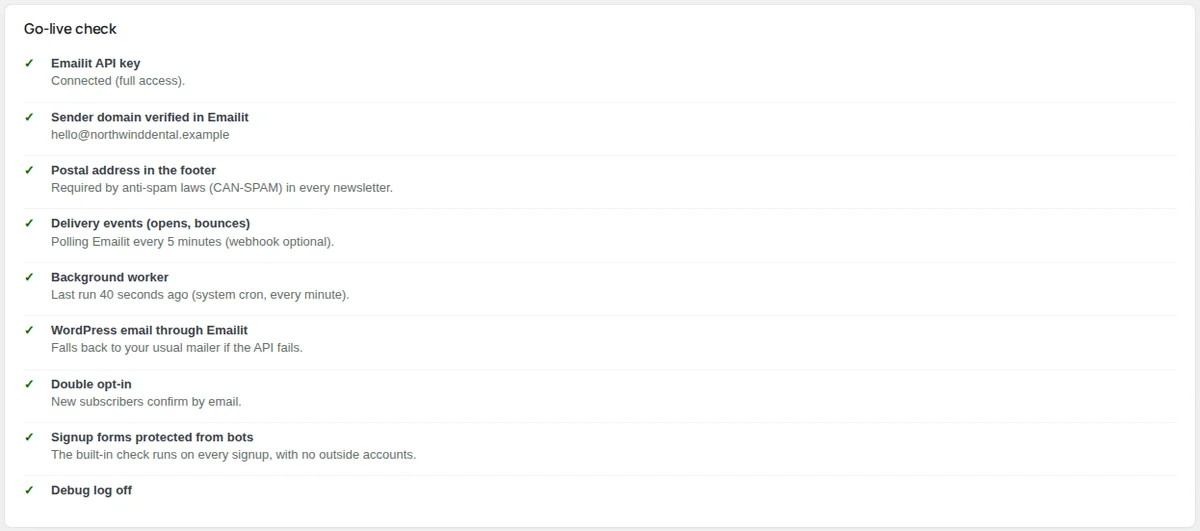
- "Emailit API key": connected, with full or sending-only access.
- "Full-access key": a warning when the key can only send.
- "Sender domain verified in Emailit": the domain of "From email".
- "Postal address in the footer": required by anti-spam laws in every newsletter.
- "Delivery events (opens, bounces)": the webhook, or reading Emailit every 5 minutes.
- "Background worker": when it last ran, and whether it was the system cron or WP-cron.
- "WordPress email through Emailit", "Double opt-in", "Signup forms protected from bots" and "Debug log off".
The Dashboard warns while any item needs attention.
Emailit connection
"Test connection" checks the key and lists your sending domains with their DNS records; the domain of your sender comes first. Below, the "Emailit API key", the webhook address and the "Signing secret (whsec_...)". See Emailit for the steps.
Sender and branding
- "From email": on a domain verified in Emailit. By default, the site admin email.
- "From name", "Reply-to" and "Company": the company is the name in the footer and on the public pages.
- "Postal address": shown in the footer of every newsletter. Required.
- "Logo URL": PNG or JPG, about 300 px wide. Empty uses the theme logo, or the site icon.
- "Brand colour": the buttons and details of emails, forms and public pages.
- "Fonts": a heading font and a text font, and the font stylesheets (one address per line) for the confirmation, unsubscribe and preference pages. Empty, forms and popups use your theme's font, and emails and public pages a system font.
- "Languages": the languages you write emails and forms in, as two-letter codes. Empty uses the site language, or the languages of Polylang when it is active.
Subscriptions
- "Double opt-in": "New subscribers confirm by email before they get newsletters". On by default and recommended: it is your proof of consent and keeps the list clean.
- "After confirming, go to": a page of your own. Empty shows the built-in thank-you page.
- "Unconfirmed signups expire after" a number of days (30 by default). They stay as leads.
Sending
- "WordPress email": "Send every WordPress email through the Emailit API". On by default: once Emailit is connected, password resets, form notices and plugin emails go through Emailit and appear in the Email log. If the API fails, the email goes out through your usual mailer as before, so keep your SMTP plugin installed as the backup. "Track opens and clicks in WordPress emails" is off by default, because click tracking rewrites links such as password resets.
- "Newsletters": "Track opens and clicks by default", on.
- "Daily limit for newsletters": 4,000 by default. Emailit allows 5,000 emails a day per workspace unless they raised your limit, counting every email; keep room for WordPress email. 0 = no limit.
- "Speed": emails per second, 1.8 by default (the Emailit maximum is 2).
- "If sending stops": the box that emails you when the system cron stops sending, and when it is back, is on by default. "Send it to" sets the address (empty means the site admin email) and its language. See System cron.
Copy of the contacts in Emailit
"Keep the contacts and lists in Emailit up to date", on by default, keeps a copy so you can see the contacts in the Emailit dashboard and use its campaigns too. It needs a full-access key. Choose "Only people who subscribed (recommended)" or "Everybody, leads included". Each list becomes an Emailit audience named after your site and the list.
Forms, anti-spam and attribution
- "Remember where visitors came from (UTM, referrer, landing page)": a first-party cookie,
lchk_attr, that lasts 90 days, so each new contact records its origin. On by default. Mention it in your cookie or privacy policy. - "Check visitors are human": "Built-in check (recommended)", "Cloudflare Turnstile" or "None". See Bot check.
- "Email verifier" and the box "Verify new signup addresses before accepting them": see Reoon.
- "Popups per visit": how many popups, slide-ins and bars may open by themselves in one visit (1 by default; 0 = no limit). Inline forms and click-to-open popups are not counted.
- "Not counted in form statistics": IP addresses or ranges, separated by commas, such as your office or a monitoring service. The screen shows your IP right now. Logged-in site managers and automated browsers are never counted.
AI writing help (optional)
The provider for the writing help in the editor, and a backup provider. See AI writing help.
Privacy and maintenance
- "Keep the email log": days of WordPress and test emails (180 by default). Campaign numbers are kept.
- "Keep raw Emailit events": days (30 by default).
- "Debug log": "Write a debug log (uploads/leads-chk-logs)". Only while investigating a problem.
- "Deleting the plugin": "Also delete every contact, list and consent record when the plugin is deleted". Off by default: see Updates and privacy.
Tools
Outside the main form, with buttons that act at once:
- "Push all contacts to Emailit again" and "Import contacts from Emailit" (with a full-access key). Importing brings every contact of the Emailit workspace, as leads; if other sites share the workspace, their contacts come in too. Audiences not linked yet become new private lists.
- "Import contacts from a CSV file": opens the import of Contacts.
- "Capture API for other sites and plugins": the capture address and its key, with "Copy" and "New key". A new key stops the sites that use the old one. See For developers.
Allowed emails
Leads Chk > Allowed emails decides which email addresses visitors can use in the Leads Chk forms: inline forms, popups, slide-ins, bars and the form under each tool. Nothing changes until you add a rule. Anyone who manages Leads Chk can open it; it sits just before About in the menu. The addresses that the other tools collect follow that tool's own rules.
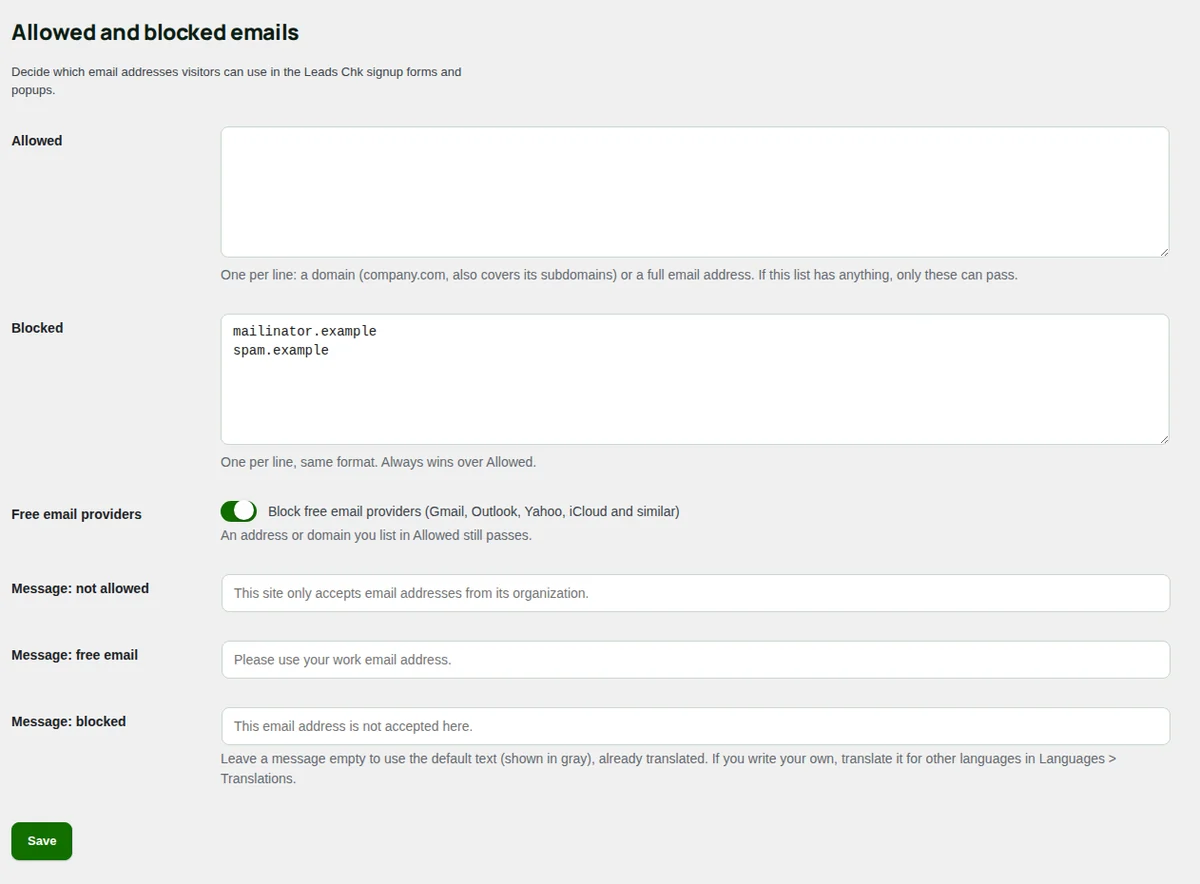
- "Allowed": one per line, a domain (
company.com, which also covers its subdomains) or a full email address. If this list has anything, only these can pass. - "Blocked": one per line, same format. It always wins over Allowed.
- "Free email providers": "Block free email providers (Gmail, Outlook, Yahoo, iCloud and similar)". An address or domain you list in Allowed still passes.
- "Message: not allowed", "Message: free email" and "Message: blocked": what the visitor reads in each case. Leave a message empty to use the default text, shown in gray and already translated. A message of your own is translated in Languages > Translations (Polylang) and shows in the form's language.
Lines that are not a domain or an email address are not saved, and the screen names them. Save with the button at the bottom.
About
Leads Chk > About shows the version and the shortcuts to "Settings", "Forms and popups" and "Campaigns".
- "First steps": connect Emailit, put a signup form on the site, send your first campaign and ask for reviews, each with its button.
- "Good to know": the four rules the plugin keeps on its own (double opt-in, an unsubscribe link in every email, bounces and complaints stop newsletters, sending paced under the Emailit limits).
- "Grow your list", "Consent", "Send", "Reviews" and "Emailit": what the plugin does, in short.
- "For developers: send contacts from another plugin": the code to send contacts from your own plugin (see For developers).
- "Documentation and support": links to this guide and to support, and where the attribution line appears.
- "Recent changes": the latest versions and what changed.
Updates and privacy
Updates
Leads Chk does not update itself. To install a new version, upload its zip in Plugins > Add Plugin > Upload Plugin: WordPress offers to replace the installed version. Your contacts, settings and forms stay. Leads Chk > About lists what changed in each version.
What leaves your site
- To Emailit: each email (recipient, subject and content) and, with the copy of the contacts on, the contacts and their lists. Emailit reports deliveries, bounces, opens and clicks back.
- To Reoon Email Verifier or Emailit, only with address checks on: the address to check.
- To your AI provider, only when you press an AI button in the editor: the text of the email and your "About your business" note.
- To Cloudflare, only with Turnstile chosen: the check of each signup.
Nothing is sent to Digital Checkmark.
What stays on your site
Contacts, lists, tags, the consent record, campaigns, forms, reviews and the email log live in your database. The lchk_attr cookie (90 days) remembers which page or campaign brought a visitor, when attribution is on.
Privacy tools
Leads Chk adds itself to the WordPress personal data tools (Tools > Export Personal Data and Tools > Erase Personal Data): the export includes the contact, where the address came from, the consent history, the review and the emails sent. It also suggests a paragraph for your privacy policy in Settings > Privacy.
When the plugin is deleted
Turning the plugin off stops the scheduled tasks and deletes nothing. Deleting it from the Plugins screen leaves your data untouched, so reinstalling brings it back, unless "Also delete every contact, list and consent record when the plugin is deleted" is on in Settings. Then every table, setting and log is removed for good. The consent record is your proof that these people agreed to be emailed: once it is gone, it cannot be rebuilt.
Attribution
Under every form and popup it shows on your site, Leads Chk shows the line "A tool by Digital Checkmark", with a link to digitalchk.com. Never in the emails or campaigns it sends. It is part of the plugin and has no setting.
For developers
Send contacts from a plugin
Leads Chk never reads other plugins: they send their contacts to it. The action does nothing when Leads Chk is not active, so no check is needed.
do_action( 'lchk_capture', array(
    'email'         => $email,
    'name'          => $name,
    'source'        => 'my-plugin',
    'source_detail' => 'Contact form',
    'data'          => array( 'plan' => 'pro' ),
    'tags'          => array( 'customer' ),
    'newsletter'    => ! empty( $_POST['subscribe'] ),
    'consent_text'  => 'Send me the newsletter',
) );
Pass 'newsletter' => true only when the person ticked a subscribe box, and describe what they agreed to in consent_text. Without it, the contact is stored as a lead. Other keys: first_name, last_name, source_ref (a unique reference that avoids duplicates), lists, lang, page_url and ip. The lchk_source_label filter gives your source a readable name.
Register as an integration
To get a card in Integrations and the shared settings block, register the source with the lchk_integration_sources filter (slug => array( 'label', 'url', 'icon' )), print the block with lchk_source_policy_fields() in your settings screen and save it with lchk_source_policy_handle(), show the checkbox with echo lchk_optin_field( 'slug' ), and send the contact with lchk_capture(). With no integration registered, Leads Chk > Integrations shows this example code.
Capture API for other sites
Other sites can POST the same fields as JSON to /wp-json/leads-chk/v1/capture, with the key of Settings > Tools in the X-Leads-Chk-Key header. The answer carries ok, contact_id, is_new and status. Up to 600 requests per hour per IP address.
Merge tags
The lchk_merge_tag filter lets a plugin offer its own tags in emails: return a text, which is escaped for you, or an array with an html key holding HTML you have already escaped. For auto-drafts, lchk_autodraft_post_tags adds tags for your posts.
Events on the page
lchk:subscribedandlchk:clickedfire on the form when someone signs up or presses a call to action.- A
data-lchk-quietattribute on<html>keeps popups that open on their own closed while it is there.
Shortcodes
[leads_chk form="ID"]: an inline form (alsoid="ID").[leads_chk_reviews]: the approved reviews, withlimit,min_rating,columnsandlang.
WP-CLI
wp leads-chk worker --time=50: runs the sending queue for up to 50 seconds (55 by default). The command for the system cron.wp leads-chk status: version, connection, queue, newsletters sent today and the last run of the worker.wp leads-chk sync,wp leads-chk pollandwp leads-chk test-connection: push pending contacts to Emailit, read new events, and test the key.
Keys in wp-config.php
Define LCHK_API_KEY, LCHK_WEBHOOK_SECRET, LCHK_AI_KEY, LCHK_AI_FB_KEY, LCHK_REOON_KEY, LCHK_TURNSTILE_SECRET or LCHK_HUB_KEY and the key is not stored in the database. The Settings screen then says "Set in wp-config.php, so it is not stored in the database."
Webhook
Emailit sends events to /wp-json/leads-chk/v1/webhook, signed with the secret of Settings. Events with a bad signature are refused.
Emailit
Emailit delivers every email Leads Chk sends and reports what happened to it. You need an Emailit account, a verified sending domain and an API key.
Verify your sending domain Required
In the Emailit dashboard, add the domain you will send from (for example northwind-dental.example) and add the DNS records it gives you at your DNS provider. Wait until Emailit shows the domain as verified. Sending from a domain that is not verified fails.
Create an API key with full access Required
In Emailit, open API Keys and create a key with full access. Full access lets Leads Chk keep the copy of your contacts and read the delivery events; a sending-only key works for email only.
Paste the key Required
In Leads Chk > Settings, paste it in "Emailit API key" and press "Save settings". Leads Chk tests it at once and says "Settings saved. Emailit connected", with the access of the key. Once saved, the field shows dots and the last four characters; leave it empty to keep the key, or tick "Remove". Safer: define LCHK_API_KEY in wp-config.php (see For developers).
Check the sender
In "Sender and branding", set "From email" on the verified domain. "Test connection" in "Emailit connection" lists your domains with their DNS records, with the sender's domain first, and the "Go-live check" turns "Sender domain verified in Emailit" green.
Live reports with the webhook Recommended
Without a webhook, Leads Chk reads the events from Emailit every 5 minutes with a full-access key. With it, opens, clicks and bounces arrive in real time.
- With a full-access key, under "Webhook (optional)", press "Create the webhook in Emailit". Leads Chk creates it with only the events it needs; the list unfolds under the button.
- In Emailit, open Webhooks, open the new webhook and copy its signing secret. Emailit only shows it there.
- Paste it in "Signing secret (whsec_...)" and press "Save settings".
When the webhook in Emailit sends other events, or is disabled, Settings shows "Webhook needs an update" and the button "Update the webhook in Emailit", which trims it without changing the secret. A webhook covers the whole Emailit workspace: if other sites send from the same workspace, their events arrive too and are ignored. A workspace per site avoids that noise.
What each event does
Delivered and bounced emails update the reports; a bounce stops emailing that address; a spam complaint unsubscribes the person at once; failed, rejected and suppressed emails show in the Email log; opens and clicks feed the reports (with tracking on); and an unsubscribe made in Emailit is applied here too.
The copy of the contacts
With a full-access key, "Keep the contacts and lists in Emailit up to date" (on by default) keeps each list as an Emailit audience. "Push all contacts to Emailit again" and "Import contacts from Emailit" are in Settings > Tools.
Limits
Leads Chk paces sending under the Emailit limit of 2 requests per second ("Speed", 1.8 by default) and stops newsletters at the "Daily limit for newsletters" (4,000 by default), to keep room for WordPress email within the 5,000 a day that Emailit allows per workspace unless they raised your limit.
System cron
Emails, the copy in Emailit, automations and auto-drafts are handled by a background worker. WordPress cron runs it only when the site gets visits, often every few minutes. A system cron that runs it every minute keeps sending steady.
Add the line to the server
In your hosting panel or the server's crontab, add a task that runs every minute, as the web server user:
* * * * * wp leads-chk worker --time=50 --path=/path/to/wordpress
Replace /path/to/wordpress with the folder of your site. It needs WP-CLI on the server; your hosting can tell you whether it has it.
Check that it runs
In Leads Chk > Settings, the "Go-live check" shows "Background worker" with the last run and "system cron, every minute". The Dashboard shows the queue and when the worker last ran.
Get an email if it stops
"If sending stops", in the "Sending" block, is on by default: once the system cron has run at least once, you get an email when it does not run for 15 minutes ("Leads Chk: the system cron stopped sending") and another when it is back. One email per incident. Nothing is lost meanwhile: emails keep going out through WordPress cron, only more slowly. "Send it to" changes the address; empty means the site admin email.
Bot check
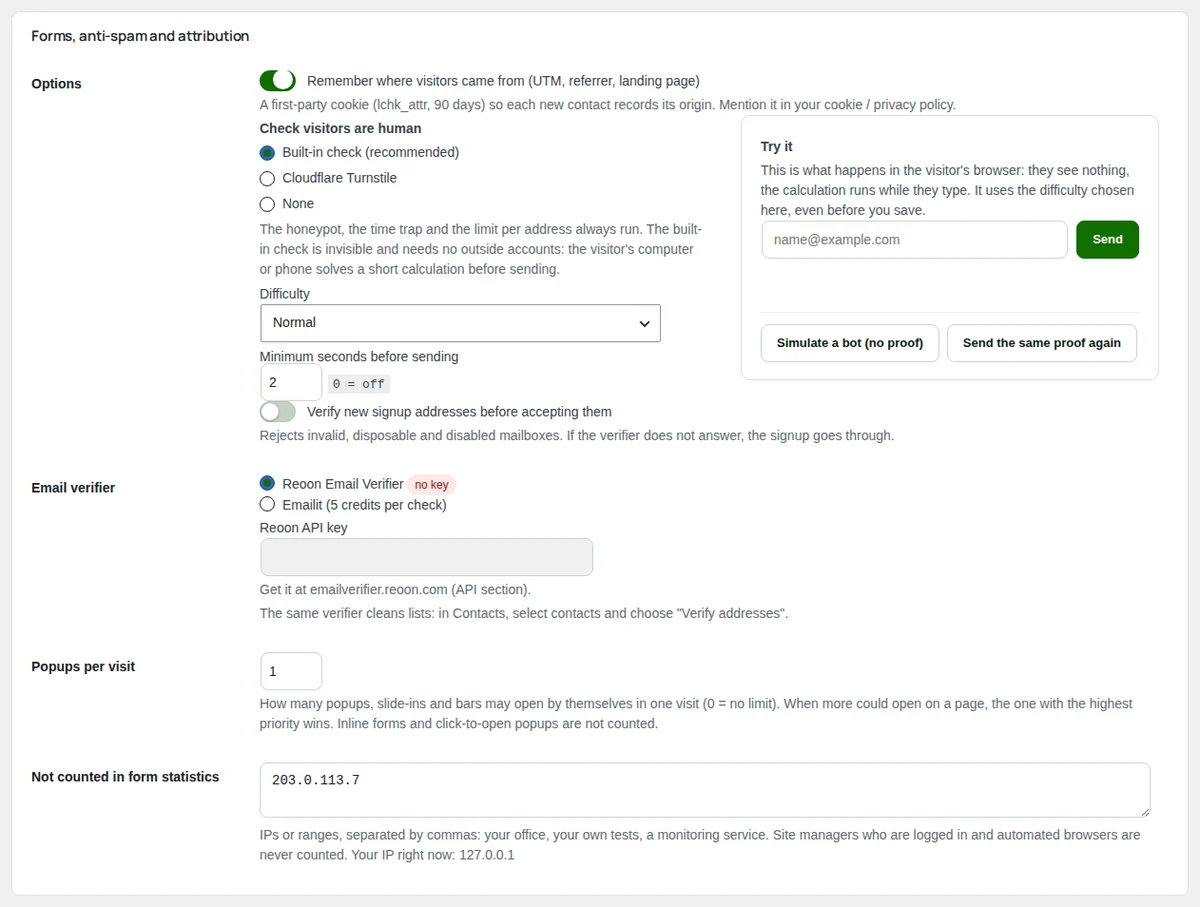
"Check visitors are human", in the "Forms, anti-spam and attribution" block of Leads Chk > Settings, protects the signup forms from bots. Whatever you choose, a hidden trap field, a minimum time and a limit per address always run.
Built-in check Recommended
Invisible, with no outside accounts. The visitor's computer or phone solves a short calculation while they type, and your site checks the answer by itself. Each answer works once and expires in 10 minutes. This is the default unless you had Turnstile with both keys.
- "Difficulty": "Low (fastest on old phones)", "Normal" (the default) or "High (more work for bots, up to a few seconds on old phones)".
- "Minimum seconds before sending": 2 by default; 0 = off. A form sent faster gets "That was quick! Please wait a few seconds and try again."
- "Try it": the box on the right runs the same check in your browser with the difficulty you chose, even before you save. "Simulate a bot (no proof)" and "Send the same proof again" show what a bot gets.
Cloudflare Turnstile
Get the keys
In the Cloudflare dashboard (dash.cloudflare.com), open Turnstile and add a widget for your site's domain. The keys are free. Copy the site key and the secret key.
Paste them
Choose "Cloudflare Turnstile", paste the site key and the "Turnstile secret key", and press "Save settings". Without both keys, the built-in check is used. The Turnstile box only shows when Cloudflare needs to ask the visitor something.
None
No check against bots. The trap field and the minimum time still run, but a real bot gets through. The "Go-live check" shows a warning.
When you change the mode
Leads Chk empties the page caches it knows, so visitors get forms with the new check. When the check starts after running without one, the pages saved in a cache before the change keep working for 12 hours.
Reoon
An address checker rejects, at signup, the addresses that do not exist, disposable mailboxes and disabled ones, and cleans the lists you already have. It is optional and off by default. Disposable addresses are always rejected, with or without it.
Get a Reoon key
Create an account at emailverifier.reoon.com and copy your key from its API section.
Paste it
In Leads Chk > Settings, block "Forms, anti-spam and attribution", choose Reoon Email Verifier in "Email verifier", paste the key in "Reoon API key" and press "Save settings". The badge next to it says "key available".
Instead of Reoon, you can choose "Emailit (5 credits per check)", which uses your Emailit key.
Check new signups
Tick "Verify new signup addresses before accepting them".
A rejected visitor reads "This email address does not seem to exist. Please check it." If the checker does not answer, the signup goes through. Each address is checked once every 30 days at most.
Clean a list
In Leads Chk > Contacts, tick the contacts, choose "Verify addresses" and press "Apply". The result says how many were checked, how many were marked "Invalid address" and how many could not be checked. Invalid addresses stop getting newsletters.
AI writing help
Optional. With an AI provider, the email editor suggests subjects, writes drafts, improves texts and translates between your languages. It works with any provider that offers an OpenAI-compatible endpoint (OpenAI, OpenRouter, Groq, Mistral, Google Gemini, DeepInfra and others). It stays off while there is no API key.
Get a key from your provider
Create an API key in your provider's dashboard and note its OpenAI-compatible endpoint (the address that ends in /chat/completions) and the name of the model.
Fill in the provider
In Leads Chk > Settings, block "AI writing help (optional)":
- "Endpoint":
https://api.openai.com/v1/chat/completionsby default. - "API key": the key. Safer in wp-config.php as
LCHK_AI_KEY. - "Model":
gpt-4.1-miniby default. "Max tokens": 8,192 by default; raise it if the AI says it ran out of tokens. - "Reasoning effort": "Not sent (provider default)" by default. For Gemini 3, choose
low. Leave "Not sent (provider default)" for providers that do not support it. - "About your business": a line about your business and your tone, so the AI writes in your voice.
Press "Save settings".
Add a backup Optional
Under "Backup AI (optional)", fill in another "Endpoint", "API key", "Model" and "Reasoning effort", from a different company. It is tried once, automatically, when the main provider fails. Leave its endpoint empty to turn it off. Its key can go in wp-config.php as LCHK_AI_FB_KEY.
Use it
Open a campaign, an automation email or an auto-draft template: the AI buttons appear in the editor (see Email editor). Each administrator can make up to 300 AI requests an hour; after that, the editor says "Too many AI requests. Try again later."
What you write and the "About your business" note go to your provider only when you press an AI button.
If something does not work
Start with the "Go-live check" at the top of Leads Chk > Settings, then the Email log. For a deeper look, turn on "Write a debug log (uploads/leads-chk-logs)" in "Privacy and maintenance" while you repeat the problem, and turn it off afterwards.
Nothing is sent
Emailit is not connected, or the key was rejected: the "Go-live check" says which. Press "Test connection". If the error says the key is not valid, create a new one in Emailit and paste it whole.
Emails take minutes to go out
The queue waits for the next run of the worker. Add the system cron (see System cron). "Background worker" in the "Go-live check" shows when it last ran.
Confirmation emails do not arrive
Check that "From email" is on a domain verified in Emailit and look for the email in the Email log (kind "Confirmations"). Ask the person to look in their spam folder. "Resend confirmation email" in the contact's profile sends it again, at most once every 10 minutes and 3 times a day.
Contacts from a tool never get the newsletter
That is by design: a tool's contacts are stored as leads unless the person opted in. If you expected a checkbox, check "What happens with the address" in that tool's Integrations screen (see Integrations).
A campaign stopped by itself
Its bounces passed 5% or its spam complaints passed 0.3%, and it paused to protect your sending reputation. The report says why and lists the failed addresses. Clean the list, then press "Resume".
Newsletters stopped for the day
They reached the "Daily limit for newsletters". They continue the next day.
Opens and clicks stay at zero
Tracking is off in the campaign, or the events do not arrive: add the webhook, or use a full-access key so Leads Chk reads Emailit every 5 minutes (see Emailit). Opens are approximate anyway.
The popup does not appear
It is a draft, it does not match "Where and to whom", the visitor closed it less than "After the visitor closes it, hide it for" days ago or already signed up, another popup used the "Popups per visit", or the page carries data-lchk-quiet (an open chat window). Test in a private window. A popup with "Only these pages" and no addresses never shows.
Visitors get "Please complete the security check."
The bot check could not run in their browser, or a page cache serves an old copy of the page after you changed the mode. Empty the page cache. With Turnstile, check that the keys belong to your domain.
No auto-draft after publishing
Check that the rule is active, that the post matches it (content type, categories and custom fields), and wait for "Wait before preparing it" plus a minute. A post that was already published and is updated does not start a rule.
"The AI ran out of tokens before answering. Raise the token limit in Settings."
Raise "Max tokens" in "AI writing help (optional)".
A WordPress email went out through SMTP
The Emailit API failed for that email and your usual mailer sent it. The Email log marks it as failed with the reason.
Getting help
"Plugin documentation", in Leads Chk > About, opens this guide.
Write to us through the support page. To help us answer fast, include:
- the Leads Chk version (at the top of Leads Chk > About), and your WordPress and PHP versions;
- what the "Go-live check" of Leads Chk > Settings says;
- the exact text of any message, and the rows of the Email log around the problem.
Do not send us your API keys or passwords.
Go to support